
Empowering Robots for Seamless Inventory Management in Small to Medium Warehouses


Built with the tools and technologies:
IROBOT is an autonomous warehouse inventory management system developed as part of a final year project at Heriot-Watt University. Designed for small to medium-sized warehouse environments, the system uses a ROS 2-powered TurtleBot3 Waffle Pi to autonomously navigate, scan, and monitor inventory shelves.
The robot identifies items using AprilTags, detects missing or unknown items, and updates this data in real-time to a user-friendly web interface built with Taipy. The system integrates key robotics and data technologies such as SLAM for mapping, Nav2 for navigation, MongoDB for inventory storage, and OpenCV for perception tasks.
🎓 University: Heriot-Watt University
👨🏫 Supervisor: Dr. Nidhal Abdulaziz
👨💻 Student: Mohammed Ibrahim
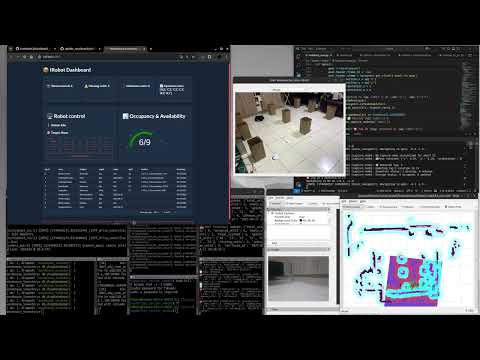
- Demonstrates scanning a fully stocked shelf with 9 known items.
- Verifies AprilTag detection and inventory logging.
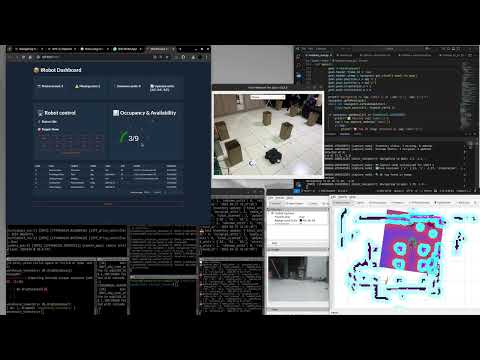
- Detects shelf with mixed inventory (known, unknown, and missing items).
- Robot receives command via the Taipy Web UI and moves to the target shelf.
- Demonstrates full integration of navigation, detection, and web control.
| Component | Specification |
|---|---|
| Robot Base | TurtleBot3 Waffle Pi |
| Processor | Raspberry Pi 4 (4GB+ recommended) |
| Camera | Raspberry Pi Camera Module v2 |
| LiDAR | RPLIDAR C1 or compatible |
| Storage | 64GB Class 10 microSD Card |
-
Flash Ubuntu Server to SD Card
- Use Raspberry Pi Imager
- Select Ubuntu 22.04 Server and enable SSH in advanced options.
-
Install ROS 2 Humble (Minimal)
-
Follow the ROS 2 Humble Installation Guide
sudo apt update && sudo apt upgrade -y
sudo apt install -y ros-humble-ros-base
-
Set Up ROS 2 Workspace
mkdir -p ~/ros2_ws/src
cd ~/ros2_ws
colcon build
source install/setup.bash
-
Clone Required Packages
-
RPLIDAR: ros2 branch
-
TurtleBot3: humble branch
cd ~/ros2_ws/src
git clone -b ros2 --single-branch https://github.com/Slamtec/rplidar_ros.git
git clone -b humble --single-branch https://github.com/ROBOTIS-GIT/turtlebot3.git
- Create and Configure the camera_pub Package
-
ssh into the Pi
 cd ~/ros2_ws/src
 ros2 pkg create --build-type ament_python camera_pub --dependencies rclpy sensor_msgs
 cd camera_pub/camera_pub
 touch camera_pub.py
 chmod +x camera_pub.py
-
Open the newly created camera_pub.py located at:
nano ~/ros2_ws/src/turtlebot3/turtlebot3_bringup/launch -
Edit the appropriate launch file (robot.launch.py) to include your camera_pub node.
-
Replace the robot.py with the contents of modified_files/robot.py from this repository.
-
Add the node in the setup_file.py
- Modify the TurtleBot3 Bringup Launch
-
Open the launch directory:
nano ~/ros2_ws/src/camera_pub/camera_pub/camera_pub.py
-
Build and Source
cd ~/ros2_ws
colcon build
source install/setup.bash
-
Check Camera Node*
ros2 run irobot camera_pub camera_pub
-
Install ROS 2 Humble (Desktop Full)
sudo apt update
sudo apt install ros-humble-desktop
-
Set Up IROBOT Workspace
mkdir -p ~/irobot_ws/src
cd ~/irobot_ws
colcon build
source install/setup.bash
-
Clone Required Packages
-
TurtleBot3: humble branch
-
IRobot: main branch
 cd ~/ros2_ws/src
 git clone -b ros2 --https://github.com/ROBOTIS-GIT/turtlebot3/tree/humble
 git clone -b humble --https://github.com/Faheemibrahim/IRobot.git
-
Packages to install
Install Navigation2 (Nav2)
sudo apt install ros-humble-navigation2
sudo apt install ros-humble-nav2-bringup
Install OpenCV Bridge
sudo apt install -y ros-humble-cv-bridge ros-humble-image-transport
-
Build and Source
cd ~/irobot
colcon build
source install/setup.bash
-
Conda Environment Setup
-
Create a Python environment for AprilTag detection and image processing:
conda create -n irobot_env python=3.10
conda activate irobot_env
conda install -c conda-forge pupil-apriltags opencv
Note: This is used by perception subprocess script
- Mapping
-
On the Robot:
-
Launch the TurtleBot3 bringup:
ros2 launch turtlebot3_bringup robot.launch.py
-
On the Laptop
-
Launch Cartographer (SLAM):
ros2 launch turtlebot3_cartographer cartographer.launch.py use_sim_time:=false
-
Control the Robot via Keyboard: In a new terminal:
ros2 run turtlebot3_teleop teleop_keyboard
-
Start Mapping: Use the arrow keys to move the robot around and build the map.

-
Save the Map Once Done: Once you're satisfied with the generated map:
ros2 run nav2_map_server map_saver_cli -f ~/ros2_ws/src/irobot/maps/custom_map_name

Note: This will create a map.pgm and map.yaml in ~/ros2_ws/src/irobot/custom_map_name.
- Waypoints
- On the Laptop
- Open your ROS 2 workspace in VS Code:
- Locate the map loading section in your custom launch file (slam_navigation.launch.py) under the irobot package:
- Replace the map.yaml with the name of your custom map file if you've saved it with a different name (warehouse_map.yaml).

-
build and source
colcon build source install/setup.bash -
Start your custom launch file (which loads the map and brings up the Nav2 stack):
ros2 launch irobot slam_navigation.launch.py
-
In RViz, use the 2D Nav Goal tool to navigate the robot to different locations.
-
Mark each location as a waypoint.

-
Open a new terminal tab, source the workspace, and echo the /waypoints topic:
-
Note down the x and y coordinates for each waypoint. You’ll use these later for navigating through waypoints.
source ~/ros2_ws/install/setup.bash
ros2 topic echo /waypoints

3.Start Inventory Management Process
-
On the Robot:
-
Launch the TurtleBot3 bringup:
ros2 launch turtlebot3_bringup robot.launch.py
-
On the Laptop
-
Launch the Web Interface
-
In separate terminals, run the sender and receiver scripts:
# Terminal 1
python3 ~/IRobot/src/other_files/sender.py

# Terminal 2
python3 ~/IRobot/src/other_files/receiver.py
-
Open VS Code and edit the waypoints dictionary to set the correct (x, y) values for your warehouse shelves:

-
build and source
colcon build source install/setup.bash -
Start Nav2 Server:
ros2 launch irobot slam_navigation.launch.py
-
Start Inventory Scanning
ros2 launch irobot inventory_scan.launch.py

- Build Custom AprilTag
-
Open the AprilTag generator source file in VS Code:
code ~/IRobot/src/other_files/generate_apriltags/Generate36h11.java -
Modify the Number of Tags: Locate the for loop and change the loop count to generate the desired number of tags.

-
Change Tag Size: Update the image dimensions.
-
To print AprilTags at an accurate physical size, you need to convert the dimensions from centimeters (cm) to pixels (px) based on the print resolution.
Pixels = (cm / 2.54) × DPI Pixels = (cm / 2.54) × 300 int imageSize = 945; // 8 cm at 300 DPI -
Compile and Build to Generate Tags
# Compile all Java files and output to the 'build/' directory
javac -d build/ $(find src -name "*.java")

# Run the AprilTag generator
java -cp build/ april.tag.Generate36h11
-
The generated AprilTags will be saved in: ~/IRobot/src/other_files/generate_apriltags/generated_tags/size_1888px/

- The taipy_modules directory contains different modular components of the full web interface before it was integrated into the final receiver.py application. These modules represent standalone UI elements used for development, testing, and individual experimentation.
- Buttons: Manual control panel with buttons for navigating the robot to predefined points (BASE, P1–P9).

- Display_picture: Displays saved images from the database.

- Menu – navigation menu used for switching between dashboard pages and views.

- Metric: Gauge to mesure how many inventories are done

- Tabular_data – Table that displays scanned inventory data including tag IDs, product info, and timestamps.

This project builds upon the work of several open-source communities and tools. Special thanks to the developers and maintainers of the following resources, which were instrumental to this project:
- ROBOTIS – for TurtleBot3 hardware, software packages, and documentation
- ROS 2 Navigation Stack (Nav2) – for autonomous navigation and path planning
- Open Robotics – for their contributions to the ROS ecosystem
- Pupil Labs AprilTags – for the AprilTags library used in visual inventory tracking
- Google Cartographer – for real-time SLAM capabilities
- Taipy – for providing workflow orchestration tools and documentation
- Other open-source packages and documentation referenced during development
Your contributions have made this work possible — thank you!
If you discover any external code, files, or assets in this repository that do not clearly indicate licensing information, please contact me at [email protected]. I will ensure proper attribution or removal as necessary.