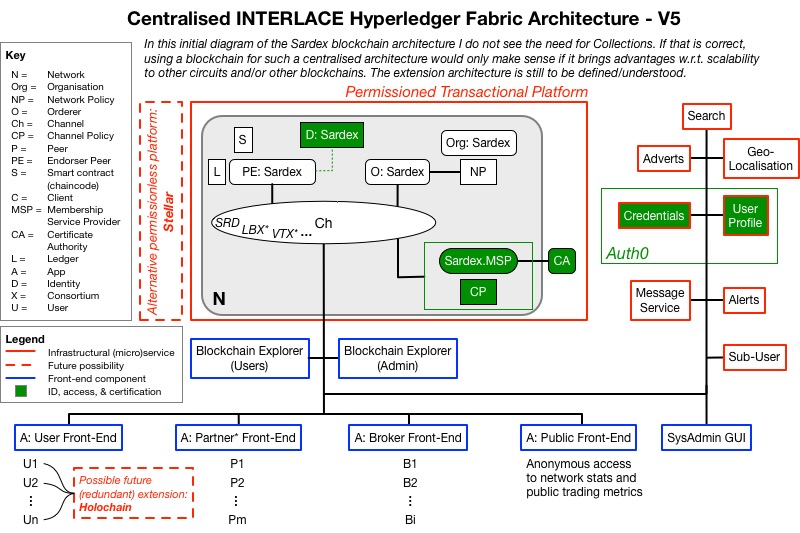
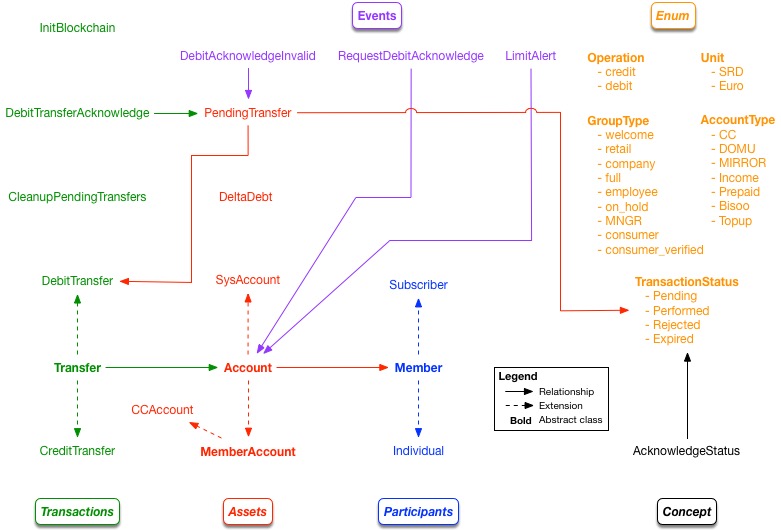
This is the Interlace blockchain implementation based on the specifications created in deliverable D3.1 as well as the ASIM Specification of the requirements.
First it is necessary to install the pre-requisites which can be found here and are available for Linux and Mac OS. Currently these are the recommended operating systems, however, with additional effort it might be possible to run the INTERLACE blockchain on Windows directly. To support windows user a virtual machine setup is also available and can be found here. It is a very simple setup based on vagrant utilizing an Ubuntu 16.04 LTS virtual machine running on a hyper-v hypervisor.
Additionally, it is also important to setup a development environment described at the composer github repository. If you do not want to set up the complete environment it would be still recommended to install and start Composer Playground. Playground enables you to connect and test the Interlace payment network. Nevertheless, playground is not required and you might use composer-cli or other methods to utilized the network.
Next you can find some help to manage the interlace blockchain and run transactions against the chain.
Before executing it is recommended for local setup to add an entry for name interlace.chain to ip 127.0.0.1 (localhost) in the OS hosts-file. Here is a list of hosts-file locations according to your operating systems
- Mac OS: /private/etc/hosts
- Linux: /etc/hosts
- Windows: C:\Windows\System32\drivers\etc\hosts
The format may vary a little but usually a new host with its hostname is defined using it's ip and the desired hostname like
127.0.0.1 interlace.chain
when referring to our Interlace configuration. Depending on the operating system it might be also necessary to update and restart the respective services.
cd fabric
./downloadFabric.sh # updates images - only the first time necessary
./startFabric.sh # start up docker environment using docker-composeFinally after fabric has been started it is necessary to initialize the block chain with a call of
cd chain
./initNetwork.sh # use hyperledger composer to create a business network and deploy it
./initNetwork.sh will copy all models and script to the network peers to make them accessible in the hyperledger blockchain.
You may further use playground to access and test Credit- and DebitTransfer transactions. data.json should act as a helper to init the network by hand, but it is recommended to update the JavaScript function initBlockchain(transfer) in ./chain/lib/init.js. That chain-code part is executed when transaction InitBlockchain is submitted.
Be careful to run InitBlockchain only once otherwise errors or duplicate entries might happen.
After changes to the acl, cto, queries, the libraries or other parts of the core chain-code application the network needs to be updated. This can be achieved by executing
./chain/updateNetwork.shThis script reads the current version number of package.json file increases it by one and creates a new bna package. When scripts are correct and the bna-package could be created it is deployed to the peers and the network updated to the new network version which will utilize the new bna package.
Sometimes it is useful to throw away everything and restart from scratch. To teardown fabric and remove card left overs execute:
cd fabric
./teardownFabric.sh
./deletePlaygroundCards.shOnce the network is running (no playground needed) it is also possible to start a HTTP-Server which allows to interact with the network over REST. The script
cd chain
./startRestServer.sh
starts the server and allows to get an overview of the restful interface by opening
http://interlace.chain:3000/explorer
in a browser. The REST interface itself may be contacted over
when using it together with an external application. In case you didn't setup the host interlace.chain in your hosts file and you are running all the services locally without a VM you might use localhost instead of interlace.chain as host name.
Next we take a closer look how the environment might be facilitated using different approaches. It is possible to connect to the chain using composer-cli, taking advantage of composer playground (the graphical interface) or use the simple web-front-end created for the project.
If you've decided to install and use Composer Playground it can be started using that command
composer-playgroundThe standard configuration opens a browser connecting to playground at localhost with port 8080. If you've running playground in a separate virtual environment like e.g. in a docker container, it may be necessary to start the browser manually, determine the VM-/Containers-IP and fill in the address manually in the URL field.
Init network transaction:
composer transaction submit -c admin@sardex-open-network -d '{ "$class": "net.sardex.interlace.InitBlockchain" }'The InitBlockchain transaction is setting up some basic accounts as well as demo members to continue with simple transactions right away.
Submit a credit transfer from account a1 to a2 with amount of 800 SRD:
composer transaction submit -c admin@sardex-open-network -d '{ "$class": "net.sardex.interlace.CreditTransfer", "amount": 800, "fromAccount": "resource:net.sardex.interlace.CCAccount#a1", "toAccount": "resource:net.sardex.interlace.CCAccount#a2" }'Submit a debit transfer from account a1 to a2 with amount of 200 SRD:
composer transaction submit -c admin@sardex-open-network -d '{ "$class": "net.sardex.interlace.DebitTransfer", "amount": 200, "fromAccount": "resource:net.sardex.interlace.CCAccount#a1", "toAccount": "resource:net.sardex.interlace.CCAccount#a2" }'A successful debit transfer creates a PendingTransfer entry with status Pending containing an OTP (one time pad). This OTP can be used by the debitor to confirm the transaction. Thus in the next example "995317396" is used to call a transaction DebitTransferAcknowledge to acknowledge the debit transfer:
composer transaction submit -c admin@sardex-open-network -d '{ "$class": "net.sardex.interlace.DebitTransferAcknowledge", "transfer": "resource:net.sardex.interlace.PendingTransfer#995317396" }'The web front-end currently is a simple web site generated by a yeoman generator provided by the composer-community. The web application can be found in the webapp directory.
In order to get the web application to run properly it is necessary to start-up the whole network and start the REST-server as described in the previous steps.
The web app which is based on AngularJS needs various node.js packages downloaded and installed which is achieved by calling
cd webapp
npm install
After that a development server can be started by calling
cd webapp
npm start
npm will start a web server at port 4200. If you work locally it also tries to open a browser which is showing the web application, otherwise you'd need start a browser manually and enter the URL by yourself. This is the URL where the server can be reached:
The web page is based on AngularJS and communicates over REST with our previously started REST server over asynchronous AJAX-request.
For developing VSCode is recommended by hyperledger composer tutorial. However, other editors are also fine. E.g. atom.io IDE is also offering a hyperledger plugin called composer-atom-plugin.
An .eslintrc.yml configuration file has been provided for the JavaScript development. Thus during development it is possible to execute
cd chain
eslint .
to check the JavaScript code for errors. eslint searches in all directories for js-files loads and checks them. Thus be careful when creating backup files. If they end in ".js" they are verified against the eslint specifications.
-
When it is necessary to communicate that something has gone wrong:
- throw Error or
- raise an event
In case of an event a transaction/transfer is recorded, without transferring any money.
-
User Management
- How to issue certificate ?
- Manage separate user accounts ?
- Assignment of permissions ?
- Should there be additional permissions on the chain? If, yes, how to handle ?
- login
-
Rest service authentication
-
How to handle event/error delivery
-
Handle private data (GDPR)
-
composer is only used for prototyping => transition to a plain fabric implementation