![]()


BlinkCard SDK is a delightful component for quick and easy scanning of payment cards. The SDK is powered with Microblink's industry-proven and world leading OCR, and offers:
- integrated camera management
- layered API, allowing everything from simple integration to complex UX customizations.
- lightweight and no internet connection required
- enteprise-level security standards
BlinkCard is a part of family of SDKs developed by Microblink for optical text recognition, barcode scanning, ID document, payment card scanning and many others.
- Requirements
- Quick Start
- Advanced BlinkCard integration instructions
MBRecognizerand available recognizers- List of available recognizers
- Troubleshooting
- Additional info
SDK package contains Microblink framework and one or more sample apps which demonstrate framework integration. The framework can be deployed in iOS 8.0 or later, iPhone 4S or newer and iPad 2 or newer.
SDK performs significantly better when the images obtained from the camera are focused. Because of that, the SDK can have lower performance on iPad 2 and iPod Touch 4th gen devices, which don't have camera with autofocus.
This Quick Start guide will get you up and performing OCR scanning as quickly as possible. All steps described in this guide are required for the integration.
This guide sets up basic Raw OCR parsing and price parsing at the same time. It closely follows the BlinkOCR-sample app. We highly recommend you try to run the sample app. The sample app should compile and run on your device, and in the iOS Simulator.
The source code of the sample app can be used as the reference during the integration.
- If you wish to use version v1.2.0 or above, you need to install Git Large File Storage by running these comamnds:
brew install git-lfs
git lfs install-
Be sure to restart your console after installing Git LFS
-
Note: if you already did try adding SDK using cocoapods and it's not working, first install the git-lfs and then clear you cocoapods cache. This should be sufficient to force cocoapods to clone BlinkCard SDK, if it still doesn't work, try deinitializing your pods and installing them again.
-
Project dependencies to be managed by CocoaPods are specified in a file called
Podfile. Create this file in the same directory as your Xcode project (.xcodeproj) file. -
If you don't have podfile initialized run the following in your project directory.
pod init
- Copy and paste the following lines into the TextEdit window:
platform :ios, '9.0'
target 'Your-App-Name' do
    pod 'MBBlinkCard', '~> 1.0.1'
end- Install the dependencies in your project:
$ pod install- From now on, be sure to always open the generated Xcode workspace (
.xcworkspace) instead of the project file when building your project:
open <YourProjectName>.xcworkspace-Download latest release (Download .zip or .tar.gz file starting with BlinkID. DO NOT download Source Code as GitHub does not fully support Git LFS)
OR
Clone this git repository:
- If you wish to clone version v1.4.0 or above, you need to install Git Large File Storage by running these comamnds:
brew install git-lfs
git lfs install-
Be sure to restart your console after installing Git LFS
-
To clone, run the following shell command:
git clone [email protected]:BlinkCard/blinkcard-ios.git-
Copy Microblink.framework and Microblink.bundle to your project folder.
-
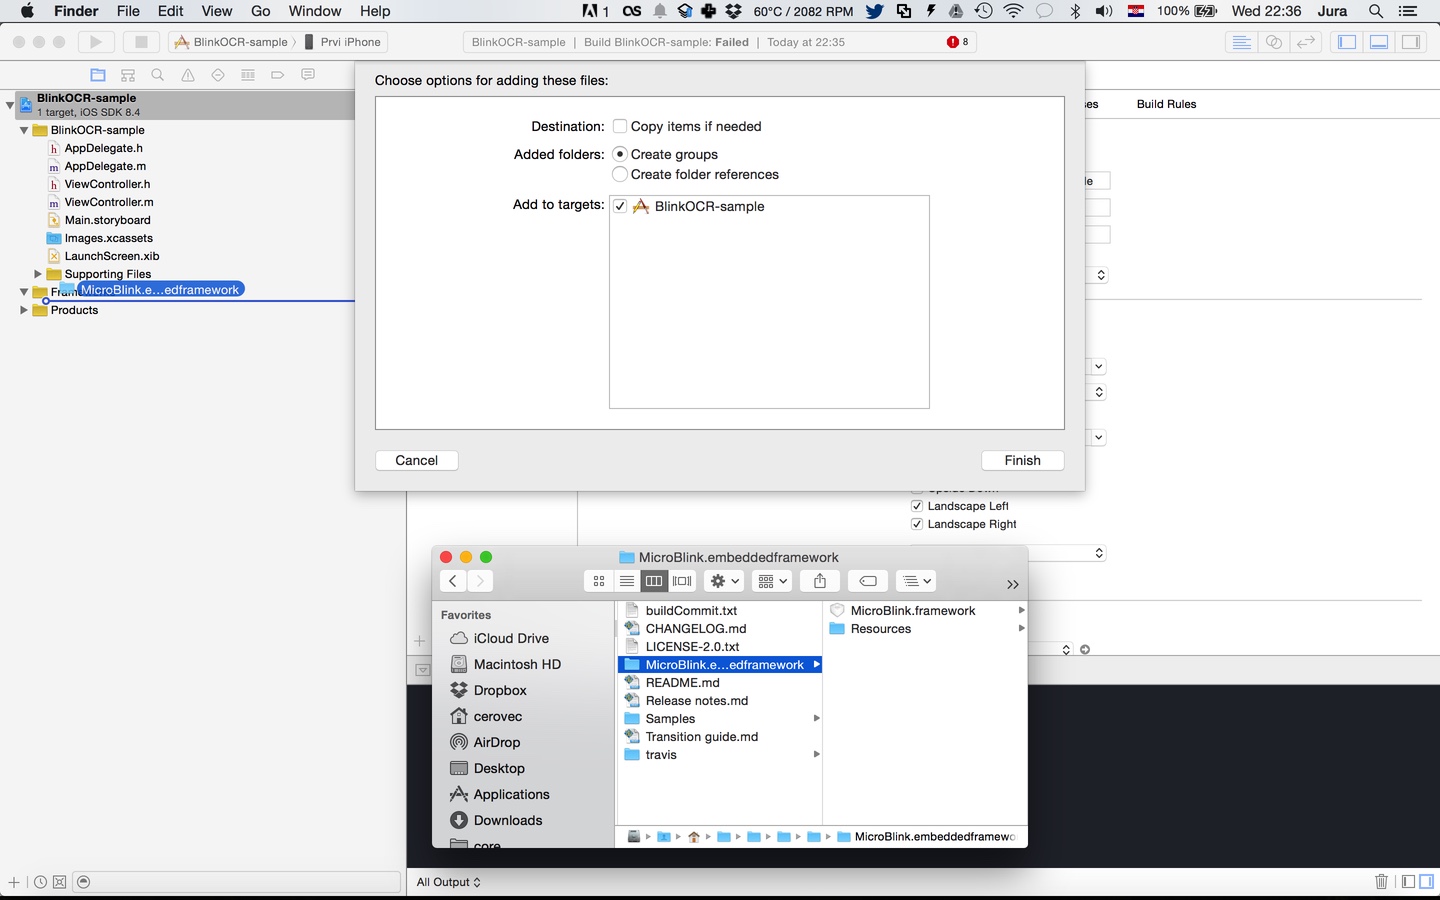
In your Xcode project, open the Project navigator. Drag the Microblink.framework and Microblink.bundle files to your project, ideally in the Frameworks group, together with other frameworks you're using. When asked, choose "Create groups", instead of the "Create folder references" option.
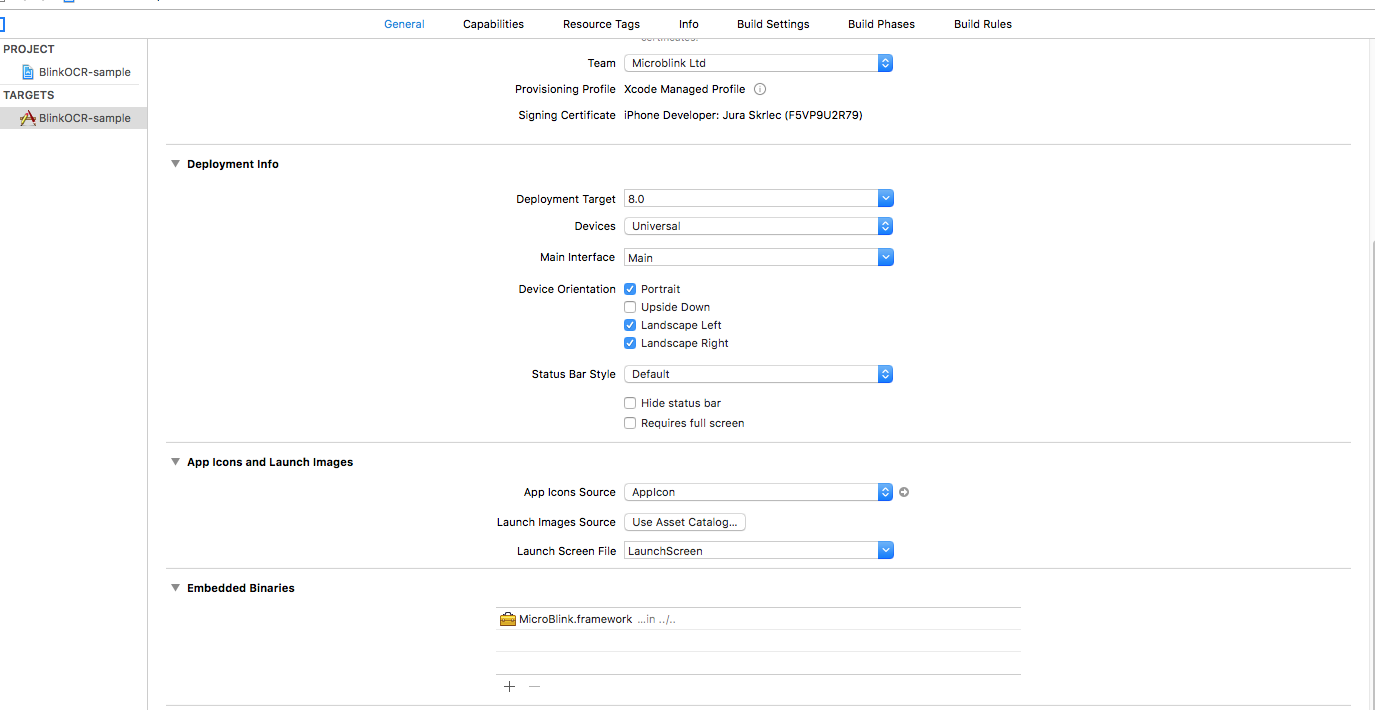
- Since Microblink.framework is a dynamic framework, you also need to add it to embedded binaries section in General settings of your target.
-
Include the additional frameworks and libraries into your project in the "Linked frameworks and libraries" section of your target settings.
- AudioToolbox.framework
- AVFoundation.framework
- CoreMedia.framework
- libc++.tbd
- libiconv.tbd
- libz.tbd

In files in which you want to use scanning functionality place import directive.
Swift
import MicroBlinkObjective-C
#import <MicroBlink/MicroBlink.h>To initiate the scanning process, first decide where in your app you want to add scanning functionality. Usually, users of the scanning library have a button which, when tapped, starts the scanning process. Initialization code is then placed in touch handler for that button. Here we're listing the initialization code as it looks in a touch handler method.
Also, for initialization purposes, the ViewController which initiates the scan have private properties for MBRawParser, MBParserGroupProcessor and MBBlinkInputRecognizer, so we know how to obtain result.
Swift
class ViewController: UIViewController, MBDocumentOverlayViewControllerDelegate  {

    var rawParser: MBRawParser?
    var parserGroupProcessor: MBParserGroupProcessor?
    var blinkInputRecognizer: MBBlinkInputRecognizer?

    override func viewDidLoad() {
        super.viewDidLoad()
    }

    @IBAction func didTapScan(_ sender: AnyObject) {

        let settings = MBDocumentOverlaySettings()
        rawParser = MBRawParser()
        parserGroupProcessor = MBParserGroupProcessor(parsers: [rawParser!])
        blinkInputRecognizer = MBBlinkInputRecognizer(processors: [parserGroupProcessor!])

        let recognizerList = [self.blinkInputRecognizer!]
        let recognizerCollection = MBRecognizerCollection(recognizers: recognizerList)

        /** Create your overlay view controller */
        let documentOverlayViewController = MBDocumentOverlayViewController(settings: settings, recognizerCollection: recognizerCollection, delegate: self)

        /** Create recognizer view controller with wanted overlay view controller */
        let recognizerRunnerViewController: UIViewController = MBViewControllerFactory.recognizerRunnerViewController(withOverlayViewController: documentOverlayViewController)

        /** Present the recognizer runner view controller. You can use other presentation methods as well (instead of presentViewController) */
        present(recognizerRunnerViewController!, animated: true, completion: nil)
    }
}
Objective-C
@interface ViewController () <MBDocumentOverlayViewControllerDelegate>

@property (nonatomic, strong) MBRawParser *rawParser;
@property (nonatomic, strong) MBParserGroupProcessor *parserGroupProcessor;
@property (nonatomic, strong) MBBlinkInputRecognizer *blinkInputRecognizer;

@end

@implementation ViewController

- (void)viewDidLoad {
    [super viewDidLoad];
}


- (IBAction)didTapScan:(id)sender {

    MBDocumentOverlaySettings* settings = [[MBDocumentOverlaySettings alloc] init];

    self.rawParser = [[MBRawParser alloc] init];
    self.parserGroupProcessor = [[MBParserGroupProcessor alloc] initWithParsers:@[self.rawParser]];
    self.blinkInputRecognizer = [[MBBlinkInputRecognizer alloc] initWithProcessors:@[self.parserGroupProcessor]];

    /** Create recognizer collection */
    MBRecognizerCollection *recognizerCollection = [[MBRecognizerCollection alloc] initWithRecognizers:@[self.blinkInputRecognizer]];

    MBDocumentOverlayViewController *overlayVC = [[MBDocumentOverlayViewController alloc] initWithSettings:settings recognizerCollection:recognizerCollection delegate:self];
    UIViewController<MBRecognizerRunnerViewController>* recognizerRunnerViewController = [MBViewControllerFactory recognizerRunnerViewControllerWithOverlayViewController:overlayVC];

    /** Present the recognizer runner view controller. You can use other presentation methods as well (instead of presentViewController) */
    [self presentViewController:recognizerRunnerViewController animated:YES completion:nil];

}

@endA valid license key is required to initalize scanning. You can generate a free demo license key, after you register, at Microblink developer dashboard.
You can include the license key in your app by passing a string or a file with license key.
Note that you need to set the license key before intializing scanning. Ideally in AppDelegate or viewDidLoad before initializing any recognizers.
You can pass the license key as a string, the following way:
Swift
MBMicroblinkSDK.sharedInstance().setLicenseKey("LICENSE-KEY")Objective-C
[[MBMicroblinkSDK sharedInstance] setLicenseKey:@"LICENSE-KEY"];Or you can include the license key, with the code below. Please make sure that the file that contains the license key is included in your project and is copied during Copy Bundle Resources build phase.
Swift
MBMicroblinkSDK.sharedInstance().setLicenseResource("license-key-file", withExtension: "txt", inSubdirectory: "directory-to-license-key", for: Bundle.main)Objective-C
[[MBMicroblinkSDK sharedInstance] setLicenseResource:@"license-key-file" withExtension:@"txt" inSubdirectory:@"" forBundle:[NSBundle mainBundle]];In the previous step, you instantiated MBDocumentOverlayViewController object with a delegate object. This object gets notified on certain events in scanning lifecycle. In this example we set it to self. The protocol which the delegate has to implement is MBDocumentOverlayViewControllerDelegate protocol. It is necessary to conform to that protocol. We will discuss more about protocols in Advanced integration section. You can use the following default implementation of the protocol to get you started.
Swift
func documentOverlayViewControllerDidFinishScanning(_ documentOverlayViewController: MBDocumentOverlayViewController, state: MBRecognizerResultState) {

    // this is done on background thread
    // check for valid state
    if state == .valid {

        // first, pause scanning until we process all the results
        documentOverlayViewController.recognizerRunnerViewController?.pauseScanning()

        DispatchQueue.main.async(execute: {() -> Void in
            // All UI interaction needs to be done on main thread
        })
    }
}

func documentOverlayViewControllerDidTapClose(_ documentOverlayViewController: MBDocumentOverlayViewController) {
    // Your action on cancel
}
Objective-C
- (void)documentOverlayViewControllerDidFinishScanning:(MBDocumentOverlayViewController *)documentOverlayViewController state:(MBRecognizerResultState)state {

    // this is done on background thread
    // check for valid state
    if (state == MBRecognizerResultStateValid) {

        // first, pause scanning until we process all the results
        [documentOverlayViewController.recognizerRunnerViewController pauseScanning];

        dispatch_async(dispatch_get_main_queue(), ^{
            // All UI interaction needs to be done on main thread
        });
    }
}

- (void)documentOverlayViewControllerDidTapClose:(MBDocumentOverlayViewController *)documentOverlayViewController {
    // Your action on cancel
}This section covers more advanced details of BlinkInput integration.
- First part will cover the possible customizations when using UI provided by the SDK.
- Second part will describe how to embed
MBRecognizerRunnerViewController's delegatesinto yourUIViewControllerwith the goal of creating a custom UI for scanning, while still using camera management capabilites of the SDK. - Third part will describe how to use the
MBRecognizerRunner(Direct API) for recognition directly fromUIImagewithout the need of camera or to recognize camera frames that are obtained by custom camera management. - Fourth part will describe recognizer concept and available recognizers.
Within BlinkCard SDK there are several built-in overlay view controllers and scanning subview overlays that you can use to perform scanning.
MBBlinkCardOverlayViewController is overlay view controller best suited for performing scanning of payment cards for both front and back side. It has MBBlinkCardOverlayViewControllerDelegate delegate which can be used out-of-the-box to perform scanning using the default UI. Here is an example how to use and initialize MBBlinkCardOverlayViewController:
Swift
/** Create your overlay view controller */
let blinkCardViewController : MBBlinkCardOverlayViewController = MBBlinkCardOverlayViewController(settings: blinkCardSettings, recognizerCollection: recognizerCollection, delegate: self)

/** Create recognizer view controller with wanted overlay view controller */
let recognizerRunneViewController : UIViewController = MBViewControllerFactory.recognizerRunnerViewController(withOverlayViewController: blinkCardViewController)

/** Present the recognizer runner view controller. You can use other presentation methods as well (instead of presentViewController) */
self.present(recognizerRunneViewController, animated: true, completion: nil)
Objective-C
MBDocumentVerificationOverlayViewController *overlayVC = [[MBBlinkCardOverlayViewController alloc] initWithSettings:settings recognizerCollection: recognizerCollection delegate:self];
UIViewController<MBRecognizerRunnerViewController>* recognizerRunnerViewController = [MBViewControllerFactory recognizerRunnerViewControllerWithOverlayViewController:overlayVC];

/** Present the recognizer runner view controller. You can use other presentation methods as well (instead of presentViewController) */
[self presentViewController:recognizerRunnerViewController animated:YES completion:nil];
As you can see, when initializing MBDocumentVerificationOverlayViewController, we are sending delegate property as self. To get results, we need to conform to MBDocumentVerificationOverlayViewControllerDelegate protocol.
Please check our pdf417-sample-Swift for custom implementation of overlay view controller.
Overlay View Controller is an abstract class for all overlay views.
It's responsibility is to provide meaningful and useful interface for the user to interact with.
Typical actions which need to be allowed to the user are:
- intuitive and meaniningful way to guide the user through scanning process. This is usually done by presenting a "viewfinder" in which the user need to place the scanned object
- a way to cancel the scanning, typically with a "cancel" or "back" button
- a way to power on and off the light (i.e. "torch") button
BlinkID SDK always provides it's own default implementation of the Overlay View Controller for every specific use. Your implementation should closely mimic the default implementation as it's the result of thorough testing with end users. Also, it closely matches the underlying scanning technology.
For example, the scanning technology usually gives results very fast after the user places the device's camera in the expected way above the scanned object. This means a progress bar for the scan is not particularly useful to the user. The majority of time the user spends on positioning the device's camera correctly. That's just an example which demonstrates careful decision making behind default camera overlay view.
To use your custom overlay with Microblink's camera view, you must first subclass MBCustomOverlayViewController and implement the overlay behaviour conforming wanted protocols.
There are five MBRecognizerRunnerViewController protocols and one overlay protocol MBOverlayViewControllerInterface.
Five RecognizerRunnerView protocols are:
MBScanningRecognizerRunnerViewControllerDelegateMBDetectionRecognizerRunnerViewControllerDelegateMBOcrRecognizerRunnerViewControllerDelegateMBDebugRecognizerRunnerViewControllerDelegateMBRecognizerRunnerViewControllerDelegate
In viewDidLoad, other protocol conformation can be done and it's done on recognizerRunnerViewController property of MBOverlayViewController, for example:
Swift and Objective-C
self.scanningRecognizerRunnerViewControllerDelegate = self;The SDK contains various subviews you can use to notify users of the state of scanning. If you want to use built-in implementation we recommend to use MBModernViewfinderSubview. In can be initialized in viewDidLoad method:
Swift
viewfinderSubview = MBModernViewfinderSubview()
viewfinderSubview.frame = view.frame
viewfinderSubview.moveable = true
view.addSubview(viewfinderSubview)
Objective-C
self.viewfinderSubview = [[MBModernViewfinderSubview alloc] init];
self.viewfinderSubview.frame = self.view.frame;
self.viewfinderSubview.delegate = self.overlaySubviewsDelegate;
self.viewfinderSubview.moveable = YES;
[self.view addSubview:self.viewfinderSubview];
To use this subview you'll need to implement MBDetectionRecognizerRunnerViewControllerDelegate(http://blinkcard.github.io/blinkcard-ios/Protocols/MBDetectionRecognizerRunnerViewControllerDelegate.html) then in the -recognizerRunnerViewController:didFinishDetectionWithDisplayableQuad: notify subview of detection changes.
Swift
func recognizerRunnerViewController(_ recognizerRunnerViewController: Any!, didFinishDetectionWithDisplayableQuad displayableQuad: MBDisplayableQuadDetection) {
    viewfinderSubview.detectionFinished(withDisplayableQuad: displayableQuad)
}
Objective-C
- (void)recognizerRunnerViewController: (nonnull UIViewController<MBRecognizerRunnerViewController> *) recognizerRunnerViewController didFinishDetectionWithDisplayableQuad: (nonnull MBDisplayableQuadDetection *)displayableQuad {
    [self.viewfinderSubview detectionFinishedWithDisplayableQuad:displayableQuad];
}In Quick Start guide it is shown how to use a default overlay view controller. You can now swap default view controller with your implementation of CustomOverlayViewController
Swift
let recognizerRunnerViewController : UIViewController = MBViewControllerFactory.recognizerRunnerViewController(withOverlayViewController: CustomOverlayViewController)Objective-C
UIViewController<MBRecognizerRunnerViewController>* recognizerRunnerViewController = [MBViewControllerFactory recognizerRunnerViewControllerWithOverlayViewController:CustomOverlayViewController];This guide will in short present you how to process UIImage objects with BlinkCard SDK, without starting the camera video capture.
With this feature you can solve various use cases like: - recognizing text on images in Camera roll - taking full resolution photo and sending it to processing - scanning barcodes on images in e-mail etc.
DirectAPI-sample demo app here will present UIImagePickerController for taking full resolution photos, and then process it with Microblink SDK to get scanning results using Direct processing API.
Direct processing API is handled with MBRecognizerRunner. That is a class that handles processing of images. It also has protocols as MBRecognizerRunnerViewController.
Developer can choose which protocol to conform:
MBScanningRecognizerRunnerDelegateMBDetectionRecognizerRunnerDelegateMBDebugRecognizerRunnerDelegateMBOcrRecognizerRunnerDelegate
In example, we are conforming to MBScanningRecognizerRunnerDelegate protocol.
To initiate the scanning process, first decide where in your app you want to add scanning functionality. Usually, users of the scanning library have a button which, when tapped, starts the scanning process. Initialization code is then placed in touch handler for that button. Here we're listing the initialization code as it looks in a touch handler method.
Swift
func setupRecognizerRunner() {
    var recognizers = [MBRecognizer]()
    pdf417Recognizer = MBPdf417Recognizer()
    recognizers.append(pdf417Recognizer!)
    let recognizerCollection = MBRecognizerCollection(recognizers: recognizers)
    recognizerRunner = MBRecognizerRunner(recognizerCollection: recognizerCollection)
    recognizerRunner?.scanningRecognizerRunnerDelegate = self
}

func processImageRunner(_ originalImage: UIImage) {
    var image: MBImage? = nil
    if let anImage = originalImage {
        image = MBImage(uiImage: anImage)
    }
    image?.cameraFrame = true
    image?.orientation = MBProcessingOrientation.left
    let _serialQueue = DispatchQueue(label: "com.microblink.DirectAPI-sample-swift")
    _serialQueue.async(execute: {() -> Void in
        self.recognizerRunner?.processImage(image!)
    })
}

func recognizerRunner(_ recognizerRunner: MBRecognizerRunner, didFinishScanningWith state: MBRecognizerResultState) {
    if blinkInputRecognizer.result.resultState == MBRecognizerResultStateValid {
        // Handle result
    }
}
Objective-C
- (void)setupRecognizerRunner {
    NSMutableArray<MBRecognizer *> *recognizers = [[NSMutableArray alloc] init];

    self.blinkInputRecognizer = [[MBBlinkInputRecognizer alloc] init];

    [recognizers addObject:self.blinkInputRecognizer];

    MBRecognizerCollection *recognizerCollection = [[MBRecognizerCollection alloc] initWithRecognizers:recognizers];

    self.recognizerRunner = [[MBRecognizerRunner alloc] initWithRecognizerCollection:recognizerCollection];
    self.recognizerRunner.scanningRecognizerRunnerDelegate = self;
}

- (void)processImageRunner:(UIImage *)originalImage {
    MBImage *image = [MBImage imageWithUIImage:originalImage];
    image.cameraFrame = YES;
    image.orientation = MBProcessingOrientationLeft;
    dispatch_queue_t _serialQueue = dispatch_queue_create("com.microblink.DirectAPI-sample", DISPATCH_QUEUE_SERIAL);
    dispatch_async(_serialQueue, ^{
        [self.recognizerRunner processImage:image];
    });
}

#pragma mark - MBScanningRecognizerRunnerDelegate
- (void)recognizerRunner:(nonnull MBRecognizerRunner *)recognizerRunner didFinishScanningWithState:(MBRecognizerResultState)state {
    if (self.blinkInputRecognizer.result.resultState == MBRecognizerResultStateValid) {
        // Handle result
    }
}
Now you've seen how to implement the Direct processing API.
In essence, this API consists of two steps:
- Initialization of the scanner.
- Call of
- (void)processImage:(MBImage *)image;method for each UIImage or CMSampleBufferRef you have.
Some recognizers support recognition from NSString. They can be used through Direct API to parse given NSString and return data just like when they are used on an input image. When recognition is performed on NSString, there is no need for the OCR. Input NSString is used in the same way as the OCR output is used when image is being recognized.
Recognition from String can be performed in the same way as recognition from image.
The only difference is that user should call - (void)processString:(NSString *)string; on MBRecognizerRunner.
The MBRecognizer is the basic unit of processing within the SDK. Its main purpose is to process the image and extract meaningful information from it. As you will see later, the SDK has lots of different MBRecognizer objects that have various purposes.
Each MBRecognizer has a MBRecognizerResult object, which contains the data that was extracted from the image. The MBRecognizerResult object is a member of corresponding MBRecognizer object its lifetime is bound to the lifetime of its parent MBRecognizer object. If you need your MBRecognizerRecognizer object to outlive its parent MBRecognizer object, you must make a copy of it by calling its method copy.
While MBRecognizer object works, it changes its internal state and its result. The MBRecognizer object's MBRecognizerResult always starts in Empty state. When corresponding MBRecognizer object performs the recognition of given image, its MBRecognizerResult can either stay in Empty state (in case MBRecognizerfailed to perform recognition), move to Uncertain state (in case MBRecognizer performed the recognition, but not all mandatory information was extracted) or move to Valid state (in case MBRecognizer performed recognition and all mandatory information was successfully extracted from the image).
As soon as one MBRecognizer object's MBRecognizerResult within MBRecognizerCollection given to MBRecognizerRunner or MBRecognizerRunnerViewController changes to Valid state, the onScanningFinished callback will be invoked on same thread that performs the background processing and you will have the opportunity to inspect each of your MBRecognizer objects' MBRecognizerResult to see which one has moved to Valid state.
As soon as onScanningFinished method ends, the MBRecognizerRunnerViewController will continue processing new camera frames with same MBRecognizer objects, unless paused. Continuation of processing or reset recognition will modify or reset all MBRecognizer objects's MBRecognizerResult. When using built-in activities, as soon as onScanningFinished is invoked, built-in activity pauses the MBRecognizerRunnerViewController and starts finishing the activity, while saving the MBRecognizerCollection with active MBRecognizer.
The MBRecognizerCollection is is wrapper around MBRecognizer objects that has array of MBRecognizer objects that can be used to give MBRecognizer objects to MBRecognizerRunner or MBRecognizerRunnerViewController for processing.
The MBRecognizerCollection is always constructed with array [[MBRecognizerCollection alloc] initWithRecognizers:recognizers] of MBRecognizer objects that need to be prepared for recognition (i.e. their properties must be tweaked already).
The MBRecognizerCollection manages a chain of MBRecognizer objects within the recognition process. When a new image arrives, it is processed by the first MBRecognizer in chain, then by the second and so on, iterating until a MBRecognizer object's MBRecognizerResult changes its state to Valid or all of the MBRecognizer objects in chain were invoked (none getting a Valid result state).
You cannot change the order of the MBRecognizer objects within the chain - no matter the order in which you give MBRecognizer objects to MBRecognizerCollection, they are internally ordered in a way that provides best possible performance and accuracy. Also, in order for SDK to be able to order MBRecognizer objects in recognition chain in a best way possible, it is not allowed to have multiple instances of MBRecognizer objects of the same type within the chain. Attempting to do so will crash your application.
This section will give a list of all MBRecognizer objects that are available within BlinkCard SDK, their purpose and recommendations how they should be used to get best performance and user experience.
The MBFrameGrabberRecognizer is the simplest recognizer in SDK, as it does not perform any processing on the given image, instead it just returns that image back to its onFrameAvailable. Its result never changes state from empty.
This recognizer is best for easy capturing of camera frames with MBRecognizerRunnerViewController. Note that MBImage sent to onFrameAvailable are temporary and their internal buffers all valid only until the onFrameAvailable method is executing - as soon as method ends, all internal buffers of MBImage object are disposed. If you need to store MBImage object for later use, you must create a copy of it by calling copy.
The MBSuccessFrameGrabberRecognizer is a special MBecognizer that wraps some other MBRecognizer and impersonates it while processing the image. However, when the MBRecognizer being impersonated changes its MBRecognizerResult into Valid state, the MBSuccessFrameGrabberRecognizer captures the image and saves it into its own MBSuccessFrameGrabberRecognizerResult object.
Since MBSuccessFrameGrabberRecognizer impersonates its slave MBRecognizer object, it is not possible to give both concrete MBRecognizer object and MBSuccessFrameGrabberRecognizer that wraps it to same MBRecognizerCollection - doing so will have the same result as if you have given two instances of same MBRecognizer type to the MBRecognizerCollection - it will crash your application.
This recognizer is best for use cases when you need to capture the exact image that was being processed by some other MBRecognizer object at the time its MBRecognizerResult became Valid. When that happens, MBSuccessFrameGrabberRecognizer's MBSuccessFrameGrabberRecognizerResult will also become Valid and will contain described image.
Payment card recognizers are used to scan payment cards.
The MBBlinkCardRecognizeris used for scanning the front and back side of Payment / Debit card.
The MBBlinkCardEliteRecognizer scans back side of elite Payment / Debit card after scanning the front side and combines data from both sides.
If your final app size is too large, you can create a customised build of MicroBlink.framework and MicroBlink.bundle which will contain only features and resources that you really need.
In order to create customised build of BlinkID SDK, you first need to download the static distribution of BlinkID SDK. A valid production licence key is required in order to gain access to the download link of BlinkID SDK static distribution. Once you have a valid production licence key, please contact our support team and ask them to provide you with the download link. After they give you access to the static distribution of BlinkID SDK, you will be able to download it from you account at MicroBlink Developer Dashboard.
The static distribution of BlinkID SDK is a large zip file (several hundred megabytes) which contains static libraries of BlinkID SDK's native code, all assets and resources and a script which will create the customised build for you.
In order to create customised build of BlinkCard SDK, you will need following tools:
- XCode and latest iOS SDK
- CMake - you can install it from Homebrew with
brew install cmake, or you can download it from official page- please note that command-line version of CMake is required, so if you have downloaded CMake from official page, make sure you install command-line support as well
- Obtain the static distribution of BlinkID SDK by contacting us
- Download the zip from link that you will be provided
- Unzip the file into an empty folder
- Edit the file
enabled-features.cmake- you should enable only features that you need to use by setting appropriate variables to
ON. - the list of all possible feature variables can be found in
features.cmake- for each
feature_optioncommand, first parameter defines the feature variable, and the second is the description of the feature, i.e. what it provides. Other parameters are information for script to work correctly.
- for each
- you should not edit any file except
enabled-features.cmake(except if instructed so by our support team) to ensure creation of customised build works well
- you should enable only features that you need to use by setting appropriate variables to
- Open terminal and navigate to folder with zip's contents.
- Execute command
./create-custom-build.shand select whether you want static or dynamic frameowk.- when asked, enter
sto build static framework ordto build dynamic framework
- when asked, enter
- After several minutes (depedending of CPU speed of your computer), customised build will appear in the
Releasefolder. Use that bundle and framework in your app instead of default one.
Attempt to use feature within your app which was not enabled in customised build will cause a linker error when linking against the customised framework.
Getting unrecognized selector sent to instance when using customised static framework, while everything works OK with dynamic framework
This happens when your app has not been linked with -ObjC flag against static framework. The problem is related to using Objective C categories within static library which are thrown away by linker. You can see more information in official Apple documentation.
App crashing when scanning starts with log message Failed to load resource XX. The program will now crash.
This means that a required resource was not packaged into final app. This usually indicates a bug in our script that makes the customised build. Please contact us and send your version of enabled-features.cmake and crash log.
You probably have a typo in enabled-features.cmake. CMake is very sensitive language and will throw an non-understandable error if you have a typo or invoke any of its commands with wrong number of parameters.
This sometimes happens when XCode's link time optimizer runs out of memory. Usually running the script again solves the problem. Please reboot your Mac if this keeps happening.
FEATURE_MRTD marks the MRTD recognizer. However, MRTD recognizer can also be used in Templating API mode where non-MRZ data can be scanned. To perform OCR of non-MRZ data, a rather large OCR model must be used, which supports all fonts. If you only plan to scan MRZ part of the document, you can edit the features.cmake in following way:
- find the following line:
feature_resources( FEATURE_MRTD model_mrtd model_general_blink_ocr model_micr model_arabic )
- keep only
model_mrtdin the list, i.e. modify the line so that it will be like this:
feature_resources( FEATURE_MRTD model_mrtd )
This will keep only support for reading MRZ zone in OCR - you will not be able to scan non-MRZ data with such configuration using MRTD recognizer, however you will reduce the MicroBlink.bundle and then final app size by more than 4MB.
model_mrtdis OCR model for performing OCR of MRZ zonemodel_arabicis OCR model for performing OCR of digits used in arabic languages - text scanning is not supportedmodel_micris OCR model for performing OCR of Magnetic Ink Charactersmodel_general_blink_ocris OCR model for performing general-purpose OCR. This model is usually required for performing OCR of non-MRZ text on documents.
In case of problems with integration of the SDK, first make sure that you have tried integrating it into XCode by following integration instructions.
If you have followed XCode integration instructions and are still having integration problems, please contact us at help.microblink.com.
In case of problems with using the SDK, you should do as follows:
If you are getting "invalid licence key" error or having other licence-related problems (e.g. some feature is not enabled that should be or there is a watermark on top of camera), first check the console. All licence-related problems are logged to error log so it is easy to determine what went wrong.
When you have determine what is the licence-relate problem or you simply do not understand the log, you should contact us help.microblink.com. When contacting us, please make sure you provide following information:
- exact Bundle ID of your app (from your
info.plistfile) - licence that is causing problems
- please stress out that you are reporting problem related to iOS version of PDF417.mobi SDK
- if unsure about the problem, you should also provide excerpt from console containing licence error
If you are having problems with scanning certain items, undesired behaviour on specific device(s), crashes inside PDF417.mobi SDK or anything unmentioned, please do as follows:
- Contact us at help.microblink.com describing your problem and provide following information:
- log file obtained in previous step
- high resolution scan/photo of the item that you are trying to scan
- information about device that you are using
- please stress out that you are reporting problem related to iOS version of PDF417.mobi SDK
Here is a list of frequently asked questions and solutions for them and also a list of known problems in the SDK and how to work around them.
In demo everything worked, but after switching to production license I get NSError with MBMicroblinkSDKRecognizerErrorDomain and MBRecognizerFailedToInitalize code as soon as I construct specific MBRecognizer object
Each license key contains information about which features are allowed to use and which are not. This NSError indicates that your production license does not allow using of specific MBRecognizer object. You should contact support to check if provided licence is OK and that it really contains all features that you have purchased.
I get NSError with MBMicroblinkSDKRecognizerErrorDomain and MBRecognizerFailedToInitalize code with trial license key
Whenever you construct any MBRecognizer object or, a check whether license allows using that object will be performed. If license is not set prior constructing that object, you will get NSError with MBMicroblinkSDKRecognizerErrorDomain and MBRecognizerFailedToInitalize code. We recommend setting license as early as possible in your app.
Make sure you link your app with iconv and Accelerate frameworks as shown in Quick start.
If you are using Cocoapods, please be sure that you've installed git-lfs prior to installing pods. If you are still getting this error, go to project folder and execute command git-lfs pull.
In my didFinish callback I have the result inside my MBRecognizer, but when scanning activity finishes, the result is gone
This usually happens when using MBRecognizerRunnerViewController and forgetting to pause the MBRecognizerRunnerViewController in your didFinish callback. Then, as soon as didFinish happens, the result is mutated or reset by additional processing that MBRecognizer performs in the time between end of your didFinish callback and actual finishing of the scanning activity. For more information about statefulness of the MBRecognizer objects, check this section.
Microblink.framework is a dynamic framework which contains slices for all architectures - device and simulator. If you intend to extract .ipa file for ad hoc distribution, you'll need to preprocess the framework to remove simulator architectures.
Ideal solution is to add a build phase after embed frameworks build phase, which strips unused slices from embedded frameworks.
Build step is based on the one provided here: http://ikennd.ac/blog/2015/02/stripping-unwanted-architectures-from-dynamic-libraries-in-xcode/
APP_PATH="${TARGET_BUILD_DIR}/${WRAPPER_NAME}"

# This script loops through the frameworks embedded in the application and
# removes unused architectures.
find "$APP_PATH" -name '*.framework' -type d | while read -r FRAMEWORK
do
FRAMEWORK_EXECUTABLE_NAME=$(defaults read "$FRAMEWORK/Info.plist" CFBundleExecutable)
FRAMEWORK_EXECUTABLE_PATH="$FRAMEWORK/$FRAMEWORK_EXECUTABLE_NAME"
echo "Executable is $FRAMEWORK_EXECUTABLE_PATH"

EXTRACTED_ARCHS=()

for ARCH in $ARCHS
do
echo "Extracting $ARCH from $FRAMEWORK_EXECUTABLE_NAME"
lipo -extract "$ARCH" "$FRAMEWORK_EXECUTABLE_PATH" -o "$FRAMEWORK_EXECUTABLE_PATH-$ARCH"
EXTRACTED_ARCHS+=("$FRAMEWORK_EXECUTABLE_PATH-$ARCH")
done

echo "Merging extracted architectures: ${ARCHS}"
lipo -o "$FRAMEWORK_EXECUTABLE_PATH-merged" -create "${EXTRACTED_ARCHS[@]}"
rm "${EXTRACTED_ARCHS[@]}"

echo "Replacing original executable with thinned version"
rm "$FRAMEWORK_EXECUTABLE_PATH"
mv "$FRAMEWORK_EXECUTABLE_PATH-merged" "$FRAMEWORK_EXECUTABLE_PATH"

doneComplete API reference can be found here.
For any other questions, feel free to contact us at help.microblink.com.