
Example of using FaunaDB with Netlify functions
Expand Table of Contents
This application is using React for the frontend, Netlify Functions for API calls, and FaunaDB as the backing database.

Click the Deploy to Netlify Button
-
Clone down the repository
git clone https://github.com/netlify/netlify-faunadb-example.git
-
Enter the repo directory
cd netlify-faunadb-example -
Install the dependencies
npm install
-
Sign up for a FaunaDB account
-
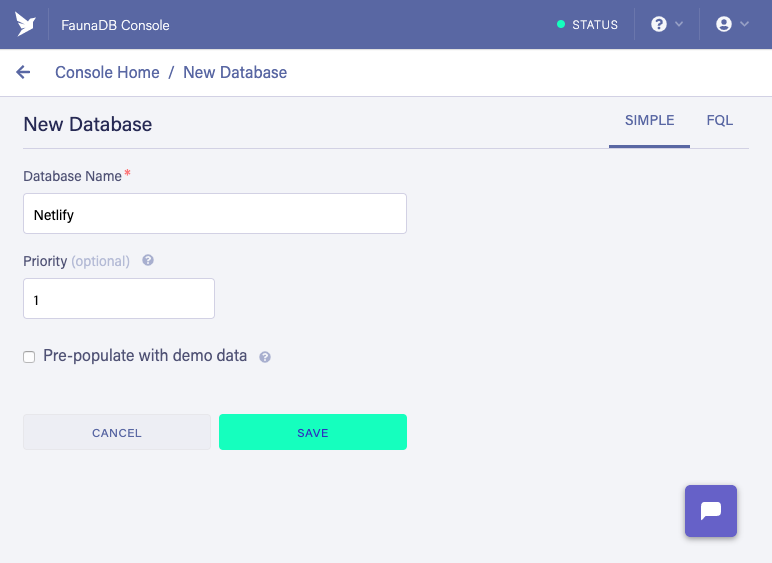
Create a database
In the Fauna Cloud Console:
- Click “New Database”
- Enter “Netlify” as the “Database Name”
- Click “Save”
-
Create a database access key
In the Fauna Cloud Console:
- Click “Security” in the left navigation
- Click “New Key”
- Make sure that the “Database” field is set to “Netlify”
- Make sure that the “Role” field is set to “Admin”
- Enter “Netlify” as the “Key Name”
- Click “Save”
-
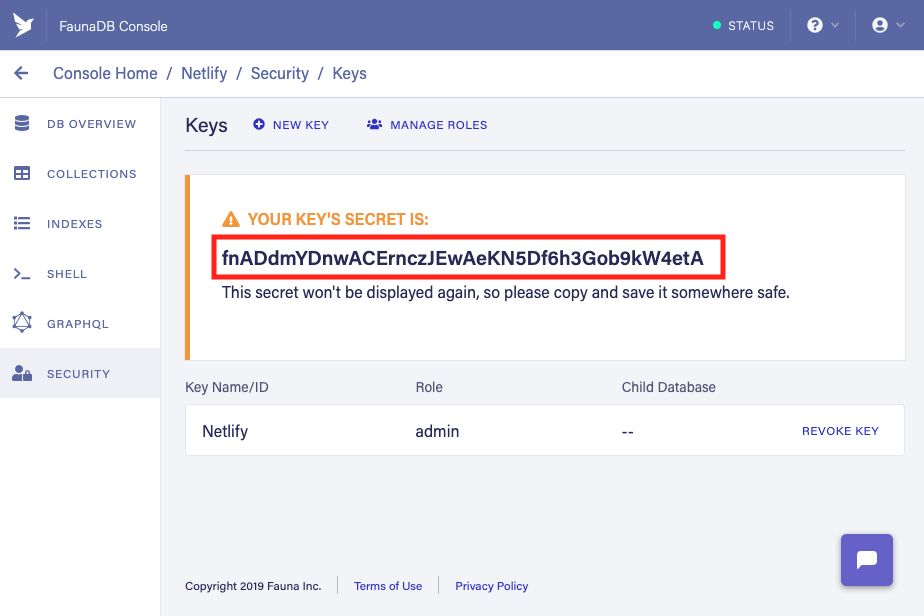
Copy the database access key’s secret
Save the secret somewhere safe; you won’t get a second chance to see it.
-
Set your database access secret in your terminal environment
In your terminal, run the following command:
export FAUNADB_SERVER_SECRET=YourFaunaDBSecretHereReplace
YourFaunaDBSecretHerewith the value of the secret that you copied in the previous step. -
Bootstrap your FaunaDB collection and indexes
npm run bootstrap
-
Run project locally
npm start
- Click the Deploy to Netlify button
-
Click “Connect to GitHub”. Authorize Netlify, when asked.
-
Paste your FaunaDB database access secret into the “Your FaunaDB Server Secret” field.
-
Click “Save & Deploy”. Netlify clones your repo, then builds and deploys your app. All done!

This application is using React for the frontend, Netlify Functions for API calls, and FaunaDB as the backing database.
We are going to explore how to get up and running with Netlify Functions and how to deploy your own serverless backend.
We are using React for this demo app, but you can use whatever you want to manage the frontend.
Into VueJS? Awesome use that.
Miss the days of jQuery? Righto, jQuery away!
Fan of VanillaJS? By all means, have at it!
-
Install create react app
npm install create-react-app -g
-
Create the react app!
create-react-app my-app
-
The react app is now setup!
# change directories into my-app
cd my-app
We are using FaunaDB to hold and store all of our todo data.
To setup a FaunaDB account and get the API key we'll use to scaffold out our todos database, head over to https://dashboard.fauna.com/accounts/register and create a free Fauna Cloud account.
-
Sign up

-
Create a key
-
Name your key and create

-
Copy this API key for later use, or use the Deploy to Netlify Button and plugin this API key.
-
Create your FaunaDB database
Set the FaunaDB API key locally in your terminal
# on mac
export FAUNADB_SERVER_SECRET=YourFaunaDBKeyHere
# on windows
set FAUNADB_SERVER_SECRET=YourFaunaDBKeyHere
Replace
YourFaunaDBSecretHerewith the value of the secret that you copied in the previous step.Add the /scripts/bootstrap-fauna-database.js to the root directory of the project. This is an idempotent script that you can run one million times and have the same result (one todos database)
Next up, add the bootstrap command to npm scripts in your
package.jsonfile{ "scripts": { "bootstrap": "node ./scripts/bootstrap-fauna-database.js" } }Now we can run the
bootstrapcommand to setup our Fauna database in our FaunaDB account.npm run bootstrap
If you log in to the FaunaDB dashboard you will see your todo database.
Now, let’s create a function for our app and wire that up to run locally.
The functions in our project are going to live in a /functions folder. You can set this to whatever you'd like but we like the /functions convention.
All AWS Lambda functions have the following signature:
exports.handler = (event, context, callback) => {
  // "event" has information about the path, body, headers, etc. of the request
  console.log('event', event)
  // "context" has information about the lambda environment and user details
  console.log('context', context)
  // The "callback" ends the execution of the function and returns a response back to the caller
  return callback(null, {
    statusCode: 200,
    body: JSON.stringify({
      data: '⊂◉‿◉つ'
    })
  })
}
We are going to use the faunadb npm package to connect to our Fauna Database and create an item.
Let's rock and roll.
-
Create a
./functionsdirectory# make functions directory mdkir functions -
Install
netlify-lambdaNetlify lambda is a tool for locally emulating the serverless function for development and for bundling our serverless function with third party npm modules (if we are using those)
npm i netlify-lambda --save-devTo simulate our function endpoints locally, we need to setup a proxy for webpack to use.
In
package.jsonadd:{ "name": "react-lambda", ... "proxy": { "/.netlify/functions": { "target": "http://localhost:9000", "pathRewrite": { "^/\\.netlify/functions": "" } } } }This will proxy requests we make to
/.netlify/functionsto our locally-running function server at port 9000. -
Add our
start&buildcommandsLet's go ahead and add our
start&buildcommand to npm scripts inpackage.json. These will let us run things locally and give a command for Netlify to build our app and functions when we are ready to deploy.We are going to be using the
npm-run-allnpm module to run our frontend and backend in parallel in the same terminal window.So install it!
npm install npm-run-all --save-devAbout
npm startThe
start:appcommand will runreact-scripts startto run our react appThe
start:servercommand will runnetlify-lambda serve functions -c ./webpack.config.jsto run our function code locally. The-c webpack-configflag lets us set a custom webpack config to fix a module issue with FaunaDB module.Running
npm startin our terminal will runnpm-run-all --parallel start:app start:serverto fire them both up at once.About
npm buildThe
build:appcommand will runreact-scripts buildto run our React app.The
build:servercommand will runnetlify-lambda build functions -c ./webpack.config.jsto run our function code locally.Running
npm run buildin our terminal will runnpm-run-all --parallel build:**to fire them both up at once.Your
package.jsonshould look like{ "name": "netlify-fauna", "scripts": { "👇 ABOUT-bootstrap-command": "💡 scaffold and setup FaunaDB #", "bootstrap": "node ./scripts/bootstrap-fauna-database.js", "👇 ABOUT-start-command": "💡 start the app and server #", "start": "npm-run-all --parallel start:app start:server", "start:app": "react-scripts start", "start:server": "netlify-lambda serve functions -c ./webpack.config.js", "👇 ABOUT-prebuild-command": "💡 before 'build' runs, run the 'bootstrap' command #", "prebuild": "echo 'setup faunaDB' && npm run bootstrap", "👇 ABOUT-build-command": "💡 build the react app and the serverless functions #", "build": "npm-run-all --parallel build:**", "build:app": "react-scripts build", "build:functions": "netlify-lambda build functions -c ./webpack.config.js", }, "dependencies": { "faunadb": "^0.2.2", "react": "^16.4.0", "react-dom": "^16.4.0", "react-scripts": "1.1.4" }, "devDependencies": { "netlify-lambda": "^0.4.0", "npm-run-all": "^4.1.3" }, "proxy": { "/.netlify/functions": { "target": "http://localhost:9000", "pathRewrite": { "^/\\.netlify/functions": "" } } } } -
Install FaunaDB and write the create function
We are going to be using the
faunadbnpm module to call into our todos index in FaunaDB.So install it in the project.
npm i faunadb --save
Then create a new function file in
/functionscalledtodos-create.js/* code from functions/todos-create.js */ import faunadb from 'faunadb' /* Import faunaDB sdk */ /* configure faunaDB Client with our secret */ const q = faunadb.query const client = new faunadb.Client({ secret: process.env.FAUNADB_SECRET }) /* export our lambda function as named "handler" export */ exports.handler = (event, context, callback) => { /* parse the string body into a useable JS object */ const data = JSON.parse(event.body) console.log("Function `todo-create` invoked", data) const todoItem = { data: data } /* construct the fauna query */ return client.query(q.Create(q.Ref("classes/todos"), todoItem)) .then((response) => { console.log("success", response) /* Success! return the response with statusCode 200 */ return callback(null, { statusCode: 200, body: JSON.stringify(response) }) }).catch((error) => { console.log("error", error) /* Error! return the error with statusCode 400 */ return callback(null, { statusCode: 400, body: JSON.stringify(error) }) }) }
Inside of the React app, we can now wire up the /.netlify/functions/todos-create endpoint to an AJAX request.
// Function using fetch to POST to our API endpoint
function createTodo(data) {
  return fetch('/.netlify/functions/todos-create', {
    body: JSON.stringify(data),
    method: 'POST'
  }).then(response => {
    return response.json()
  })
}

// Todo data
const myTodo = {
  title: 'My todo title',
  completed: false,
}

// create it!
createTodo(myTodo).then((response) => {
  console.log('API response', response)
  // set app state
}).catch((error) => {
  console.log('API error', error)
})
Requests to /.netlify/function/[Function-File-Name] will work seamlessly on localhost and on the live site because we are using the local proxy with webpack.
We will be skipping over the rest of the frontend parts of the app because you can use whatever framework you'd like to build your application.
All the demo React frontend code is available here.
So far we have created our todo-create function and we've seen how we make requests to our live function endpoints. It's now time to add the rest of our CRUD functions to manage our todos.
-
Read Todos by ID
Then create a new function file in
/functionscalledtodos-read.js/* code from functions/todos-read.js */ import faunadb from 'faunadb' import getId from './utils/getId' const q = faunadb.query const client = new faunadb.Client({ secret: process.env.FAUNADB_SECRET }) exports.handler = (event, context, callback) => { const id = getId(event.path) console.log(`Function 'todo-read' invoked. Read id: ${id}`) return client.query(q.Get(q.Ref(`classes/todos/${id}`))) .then((response) => { console.log("success", response) return callback(null, { statusCode: 200, body: JSON.stringify(response) }) }).catch((error) => { console.log("error", error) return callback(null, { statusCode: 400, body: JSON.stringify(error) }) }) }
-
Read All Todos
Then create a new function file in
/functionscalledtodos-read-all.js/* code from functions/todos-read-all.js */ import faunadb from 'faunadb' const q = faunadb.query const client = new faunadb.Client({ secret: process.env.FAUNADB_SECRET }) exports.handler = (event, context, callback) => { console.log("Function `todo-read-all` invoked") return client.query(q.Paginate(q.Match(q.Ref("indexes/all_todos")))) .then((response) => { const todoRefs = response.data console.log("Todo refs", todoRefs) console.log(`${todoRefs.length} todos found`) // create new query out of todo refs. http://bit.ly/2LG3MLg const getAllTodoDataQuery = todoRefs.map((ref) => { return q.Get(ref) }) // then query the refs return client.query(getAllTodoDataQuery).then((ret) => { return callback(null, { statusCode: 200, body: JSON.stringify(ret) }) }) }).catch((error) => { console.log("error", error) return callback(null, { statusCode: 400, body: JSON.stringify(error) }) }) }
-
Update todo by ID
Then create a new function file in
/functionscalledtodos-update.js/* code from functions/todos-update.js */ import faunadb from 'faunadb' import getId from './utils/getId' const q = faunadb.query const client = new faunadb.Client({ secret: process.env.FAUNADB_SECRET }) exports.handler = (event, context, callback) => { const data = JSON.parse(event.body) const id = getId(event.path) console.log(`Function 'todo-update' invoked. update id: ${id}`) return client.query(q.Update(q.Ref(`classes/todos/${id}`), {data})) .then((response) => { console.log("success", response) return callback(null, { statusCode: 200, body: JSON.stringify(response) }) }).catch((error) => { console.log("error", error) return callback(null, { statusCode: 400, body: JSON.stringify(error) }) }) }
-
Delete by ID
Then create a new function file in
/functionscalledtodos-delete.js/* code from functions/todos-delete.js */ import faunadb from 'faunadb' import getId from './utils/getId' const q = faunadb.query const client = new faunadb.Client({ secret: process.env.FAUNADB_SECRET }) exports.handler = (event, context, callback) => { const id = getId(event.path) console.log(`Function 'todo-delete' invoked. delete id: ${id}`) return client.query(q.Delete(q.Ref(`classes/todos/${id}`))) .then((response) => { console.log("success", response) return callback(null, { statusCode: 200, body: JSON.stringify(response) }) }).catch((error) => { console.log("error", error) return callback(null, { statusCode: 400, body: JSON.stringify(error) }) }) }
-
Delete batch todos
Then create a new function file in
/functionscalledtodos-delete-batch.js/* code from functions/todos-delete-batch.js */ import faunadb from 'faunadb' import getId from './utils/getId' const q = faunadb.query const client = new faunadb.Client({ secret: process.env.FAUNADB_SECRET }) exports.handler = (event, context, callback) => { const data = JSON.parse(event.body) console.log('data', data) console.log("Function `todo-delete-batch` invoked", data.ids) // construct batch query from IDs const deleteAllCompletedTodoQuery = data.ids.map((id) => { return q.Delete(q.Ref(`classes/todos/${id}`)) }) // Hit fauna with the query to delete the completed items return client.query(deleteAllCompletedTodoQuery) .then((response) => { console.log("success", response) return callback(null, { statusCode: 200, body: JSON.stringify(response) }) }).catch((error) => { console.log("error", error) return callback(null, { statusCode: 400, body: JSON.stringify(error) }) }) }
After we deploy all these functions, we will be able to call them from our frontend code with these fetch calls:
/* Frontend code from src/utils/api.js */
/* Api methods to call /functions */

const create = (data) => {
  return fetch('/.netlify/functions/todos-create', {
    body: JSON.stringify(data),
    method: 'POST'
  }).then(response => {
    return response.json()
  })
}

const readAll = () => {
  return fetch('/.netlify/functions/todos-read-all').then((response) => {
    return response.json()
  })
}

const update = (todoId, data) => {
  return fetch(`/.netlify/functions/todos-update/${todoId}`, {
    body: JSON.stringify(data),
    method: 'POST'
  }).then(response => {
    return response.json()
  })
}

const deleteTodo = (todoId) => {
  return fetch(`/.netlify/functions/todos-delete/${todoId}`, {
    method: 'POST',
  }).then(response => {
    return response.json()
  })
}

const batchDeleteTodo = (todoIds) => {
  return fetch(`/.netlify/functions/todos-delete-batch`, {
    body: JSON.stringify({
      ids: todoIds
    }),
    method: 'POST'
  }).then(response => {
    return response.json()
  })
}

export default {
  create: create,
  readAll: readAll,
  update: update,
  delete: deleteTodo,
  batchDelete: batchDeleteTodo
}That's it. You now have your own CRUD API using Netlify Functions and FaunaDB.
As you can see, functions can be extremely powerful when combined with a cloud database!
The sky is the limit on what you can build with the JAMstack and we'd love to hear about what you make. Give us a shout about it on Twitter
Next Steps
This example can be improved with users/authentication. Next steps to build out the app would be:
- Add in the concept of users for everyone to have their own todo list
- Wire up authentication using the JSON web token-based Netlify Identity
- Add in due dates to todos and wire up Functions to notify users via email/SMS
- File for IPO?