If you already know what github is, skip this section.
Github is for project management! Here's some reasons to use Github:
- It allows you to share projects, either with a team or with the whole world, and set permissions on who can and can't contribute.
- If you don't have permission to edit a project, you can 'fork' it -- make a copy of it -- and edit it all you want Github uses Git, a version control system (like SVN, if you've used that) that lets you work on your projects from any computer, and lets you go between different saved versions anytime you want.
- When you have multiple people working on a project, Git also helps handle "merge conflicts" -- when two different users submit two different, conflicting submissions.
- A bunch of other neat organization tools, like issues, wikis, and readme files like this one!!
- Git Version control system. You install this on your computer to let you easily move things to and from Github
- Github The website hosting everything submitted by Git.
- Repository (or repo) Any github project. Basically just a set of files hosted on GitHub.
- Clone You can take a Github repo and clone it to your local computer so you can work on it.
- Commit Once you have a local clone of a repo, you can submit a commit of your changes back to the parent repo. Each commit is basically a 'version', when we talk about version control.
- Go to github.com and sign up with a unique username, and an email you can access.
- Select the free account option and press continue.
- You'll now need to confirm your email.
git --version
and press enter. If you don't have it yet, follow these instructions, and then restart your terminal to see if it worked.
If you're using a Windows computer, open up Windows Powershell. You should be able to find it by searching for it. (Command Prompt would also work.) To see if you have git, type:git --version
and press enter.
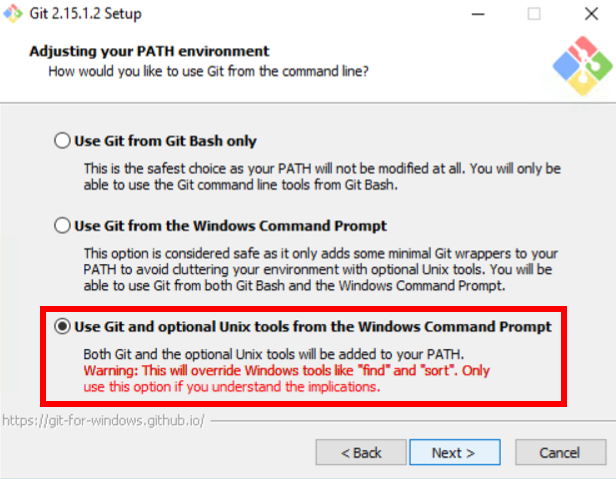
If not, follow the install wizard here: https://git-scm.com/downloads
It's a suggestion to "use Git and optional Unix tools from the Windows Command Prompt." The rest of the options, the default settings will work.
If you don't have it yet, follow these instructions, and then restart your powershell to see if it worked. For either setup, remember to do these commands too:
git config --global user.name "Your name" OR
git config --global user.email "[email protected]"
Once you have a confirmed Github account, click on the + icon in the upper lefthand corner of GitHub, and select "New Repository". Name your repository whatever you want -- "My first site" or something. Add a description, decide whether you want it to be public or not, and check the box that says "initialize this repository with a README". Congrats, you just made your first Github repo!
Now that you have Git installed, we can finally clone our repo! But first, we need to learn how to use our terminal.
Your terminal always points to somewhere on your computer, and we can type different commands to navigate through our computer and interact with files. (Tip: Pressing 'tab' in the terminal will try to autocomplete whatever you're typing.)
Here are the terminal commands we'll be using:
cd [somewhere] stands for "change directory". Replace [somewhere] with an existing folder.
cd ../ will take you back one folder (ex: if you're in ~/Files/myfolder/, cd .. takes you to ~/Files/)
ls is an abbreviation for "list", which doesn't make sense but whatever. It lists all the files and folders in your current directory.
mkdir [folder name] stands for "make directory". Will make a folder named [folder name] in the current directory.
Type cd Desktop you'll navigate straight to your desktop. From there, navigate to wherever you want to keep your project on your folder. You can also type:
mkdir hacksuProjects
or something to make a folder named "hacksuProjects" on your desktop (You would then type cd hacksuProjects/ to go inside of that folder.)
Once you're in the folder you want to store your projects, go back to your github repo, and click the green Go to your repo page on Github and find the green button that says 'Clone or download', and copy the URL it shows. Go back to the terminal and the following command, replacing [ur] with the URL you copied:
git clone [url]
You just cloned your repo to your computer! You can now enter cd [repo name] to go into your repo.
Open a text editor like VS Code, Atom or even notepad.
Let's create and checkout a new branch. ```git checkout -b [branch name]``` See if it created your new branch by doing ```git branch``` We'll make the changes just on this branch.In your local clone of your repo, make a new file and name it with the extension .html, like "index.html" or "website.html". In this file, we'll be writing HTML, our first language! Then, go to the file and double click it. It should open up in your browser, just like a normal website would!
<html>
 <head>

 <title>My first website, yo !</title>

 </head>
 <body>

  <h1>Best website ever</h2>

  <p>Here's some text in a 'paragraph' tag</p>
  <p>Here's some more text, with a <a href="https://youtu.be/zbc2LUAP6G4">link!</a>
  <img src="https://i.kym-cdn.com/entries/icons/mobile/000/025/999/Screen_Shot_2018-04-24_at_1.33.44_PM.jpg" height="200px" width="400px">

 <div class="myDiv"> This is a special divider.</div>

  <button onclick="alert('hello world')">Here's a button </button>

  <!-- This is an HTML comment. It won't affect the actual content of the page -->

 </body>
</html>
Save these changes. If we do, git status, we'll see the file was changed.
Go to the file location in your file explorer/finder and double click it. It should open up in your browser and you can see the HTML code!
Note: HTML is used to format text, and tell the browser what each text is for. It works by surrounding text opening tags, like , and closing tags, like . The head tags surround information about the website, while the body tags show the actual content of the website. If any of these tags confuse you, turn to google to learn about them!
So, now we have a website! Let's save it to our Github repo, so the whole world can see it! Go back to your terminal and navigate to your repo folder. There's three steps to saving to Github: Add your files by typing:
git add [filename]
The astrisk is used to mean "everything in this folder." Alternatively, we could type git add index.html to only submit a single files.
Commit your files with:
git commit -m "initialized index"
Note that commiting your code creates a log of what has been added, and gets it ready to put onto Github, but it doesn't actually transfer it yet!
Entergit push to "push" all your local commits to your github repo.
If you didn't get any errors, go to Github and see if your code is all there!
If working within the command line is not your preference, there are some great GUIs out there. Check out an extensive list per OS here: https://git-scm.com/downloads/guis
SourceTree is one of the options in that list and it comes from the Atlassian family (owners of Trello, Jira, BitBucker and more).Downloading SourceTree:
- Download at https://www.sourcetreeapp.com/ or just follow along with the lesson
- Select Bit Bucket option (not Bit Bucket server)
- There should be a pop-up prepopulated with GitHub credentials. If that’s not there, enter your GitHub credentials.
- If asked if you need a SSH key, say “no.”
body {
  background: cyan;
}

p {
  color: red;
  font-family: Courier;
}

.myDiv {
  width: 400px;
  height: 300px;
  border: solid 2px black;
  border-radius: 25%;
  background: yellow;

  animation: myAnimation 10s infinite;
}

@keyframes myAnimation {
  from {
    filter: hue-rotate(0deg);
  }
  to {
    filter: hue-rotate(360deg);
  }
}
Let’s make our index.html connect with the styling.css file that is now in our editor.
Now, to link it to our HTML file, we need to add this in our head tags in our html file:
<head>

 <title>Best website ever</title>
 <link rel="stylesheet" href="style.css">

 </head>
Save your HTML and see if the styles were applied! Make sure that in href="style.css", "style.css" is the exact same name as your css file. Also make sure your css file is in the same folder as your .html file!
In Sourcetree, go to “File Status” and we should grey box showing the changes made to the files. We should see whatever changes we made to index.html shown in there. If we want to commit those changes, select the file name, hit “stage selected.” It should move into the “staged files” box. This is taking place of the git add * command we did earlier.
We are ready to write our commit message. Do this in the bottom-most box (underneath your username). This is taking place of the git commit -m "message" command we did earlier.
The “push” feature at the top should now have a blue oval with the number of files to commit. Select “master” branch under “Branches.” Notice that to the right, it shows the changes by denoting green for additions, yellow for modifications and red for anything removed. Hit “push.” This is taking place of the git push command we did earlier.
Verify that changes were pushed in GitHub. Then try opening index.html locally to see the new styling!
Credit to Ben Holland for writing the GitHub portion of this lesson! Thanks, Ben! :D