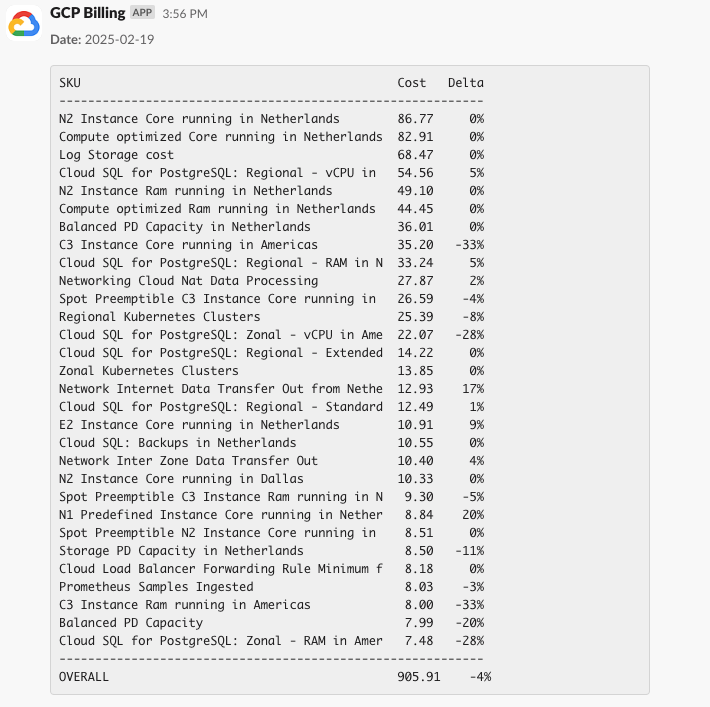
This repository retrieves daily GCP billing data from BigQuery (reporting on the day before yesterday due to export delays), aggregates costs by SKU and project, calculates cost deltas, and sends a formatted report to Slack. A GitHub Actions workflow builds a Docker image and pushes it to GitHub Artifact Registry. You can then deploy the image to GCP Cloud Run using the Cloud Console UI.
- Google Cloud Project with billing enabled.
- Google Service Account with the following roles:
- BigQuery Data Viewer (
roles/bigquery.dataViewer) - BigQuery Job User (
roles/bigquery.jobUser)
- BigQuery Data Viewer (
- Slack Workspace and a Slack Bot with these scopes:
chat:writeconversations:readconversations:write
- Docker (if you plan to build images locally)
- A GitHub repository to host this code
- In the Google Cloud Console, navigate to IAM & Admin > Service Accounts.
- Create a new service account (e.g.,
billing-reporter-sa). - Grant the service account the roles:
- BigQuery Data Viewer
- BigQuery Job User
- Create and download a JSON key file.
- Save the key file as service-account.json near docker-compose file.
- Go to Slack API: Your Apps.
- Click "Create New App".
- Choose "From scratch".
- Enter an App Name (e.g.,
GCP Billing Reporter Bot). - Select the Development Slack Workspace where you want to install the app.
- Click "Create App".
- In your app's settings, click "OAuth & Permissions".
- Under "Bot Token Scopes", add the following scopes:
chat:write— Allows the bot to send messages.conversations:read— Allows the bot to read channel and conversation information.conversations:write— Allows the bot to manage conversations.- (Optional)
im:history— Allows the bot to read direct message history, if needed.
- Click "Save Changes".
- In the "OAuth & Permissions" page, click "Install App to Workspace".
- Review the permissions, then click "Allow".
- After installation, copy the Bot User OAuth Token (it starts with
xoxb-).
This token is needed to authenticate API requests.
- Store your Bot User OAuth Token securely (for example, in environment variables or a secrets manager).
- Use this token in your application when calling Slack API methods such as
chat.postMessage.
To use this application, you must export your GCP billing data to BigQuery. Follow these steps:
-
Open Billing Settings:
- Go to the Google Cloud Console Billing page.
- Select your billing account.
-
Enable BigQuery Export:
- In the left-hand menu, click on Billing export.
- Under BigQuery export, click Edit settings.
- Choose an existing BigQuery dataset or create a new one to store your billing data.
- Enable the Daily Cost Export option.
- Click Save to apply your settings.
-
Wait for Data Population:
- It may take up to 24 hours for the exported data to appear in your BigQuery dataset.
Configure the following environment variables (for example, in a .env file or via your deployment settings):
SLACK_API_TOKEN=your-slack-bot-token
SLACK_CHANNEL_ID=your-channel-or-user-id
BQ_TABLE=[project name].all_billing_data.gcp_billing_export_resource_v1_[billing account ID]This project includes a Dockerfile that defines the image for the GCP Billing Cost Reporter. You can run the application locally using Docker Compose.
docker-compose up --build
This application requires sensitive data—such as secret environment variables and a service account JSON file—to operate. To keep these secrets secure, store them in Secret Manager and mount them to your Cloud Run service.
-
Open Secret Manager:
- Go to the Secret Manager Console.
-
Create Secrets:
- SLACK_API_TOKEN:
- Click "Create Secret".
- Name it
SLACK_API_TOKENand paste your Slack Bot token.
- SLACK_CHANNEL_ID:
- Create another secret named
SLACK_CHANNEL_IDand paste your target channel or user ID.
- Create another secret named
- Service Account File:
- Create a secret (e.g.,
billing-sa) and upload your service account JSON file contents.
- Create a secret (e.g.,
- SLACK_API_TOKEN:
-
Open Cloud Run:
- Go to the Cloud Run Console.
-
Create a New Service:
- Click "Create Service".
- Enter a service name (e.g.,
gcp-billing-reporter).
-
Specify the Container Image:
- In Container image URL, enter the URL of your Docker image (for example:
ghcr.io/<your-github-username>/<repository-name>:latest).
- In Container image URL, enter the URL of your Docker image (for example:
-
Configure Environment Variables and Secrets:
- In the Variables & Secrets section, add the following environment variables by clicking "Reference a Secret" for each:
- SLACK_API_TOKEN:
Select the secret version of yourSLACK_API_TOKEN. - SLACK_CHANNEL_ID:
Select the secret version of yourSLACK_CHANNEL_ID.
- SLACK_API_TOKEN:
Your application also uses two non-secret environment variables. In the same Variables & Secrets section, add these as plain environment variables:
-
SEND_PROJECT_BREAKDOWN:
- Click "Add Variable".
- Enter
SEND_PROJECT_BREAKDOWNas the name and set its value (for example,true).
-
SEND_THREAD_DETAILS:
- Click "Add Variable".
- Enter
SEND_THREAD_DETAILSas the name and set its value (for example,true).
-
Mount the Service Account File:
- Before mounting the file in "Volume Mounts", attach it in Volumes next to Containers section
- In the Containers section, click "Add Mount".
- Choose Secret and select your
billing-sa-jsonsecret. - Set the mount path to:
/var/secrets/billing-sa - This makes the service account file available to your application.
- In the Variables & Secrets section, add the following environment variables by clicking "Reference a Secret" for each:
-
Set Additional Configuration:
- Choose your region (e.g.,
europe-west4). - Configure CPU, memory, and concurrency as needed.
- Choose your region (e.g.,
-
Deploy:
- Click "Create" to deploy your Cloud Run service.
Remove any unused resources (such as Cloud Run services or service accounts) to avoid unnecessary charges.