Drupal Configuration
First of all, here is The official installstion guide of Drupal which provides a clear and detailed instruction to set up Drupal.
Here is a quick guide:
- Check system requirements
- Download and extract Drupal
- Create the database
- Create the settings.php file
-
Run the installation script
Please be patient during this step, otherwise errors may occur. - Set up cron
- Configure clean URLs
- After Installation
If you meet blank pages or white screen of death during installation, open update.php in a text editor and uncomment the following line:
ini_set('display_errors', FALSE);
If the problem occurs somewhere else, please refer to this documentation Blank pages or "white screen of death" (WSOD).
cd to the drupal folder, then run sudo chown -R www-data ./ and sudo chmod -R 755 ./
The www-data should be the user running the website, it could be www or others on your server.
When you generate the app, please provide the URL of your Drupal website. It should be the folder where index.php and xmlrpc.php stays.
The app will upload all images to the folder specified during generation. You can see those images in the content of Drupal.
You need to install the Drupapp plugin into the Drupal website. While using the app to upload images, an account of your Drupoid site is required. Make sure those accounts have appropriate permissions.
Drupapp is part of the GitHub repository of Drupoid. You can see the Drupapp plugin at https://github.com/swentel/Drupoid/tree/master/drupal/drupapp.
Please follow the instructions of Drupoid to install the plugin.
Enable the module, give yourself the 'administer drupapp' permission and go to admin/config/media/drupapp where you need to configure settings like image field etc.
A number of timeline plugins are available for Drupal. One choice is A Simple Timeline. It's an open-source module licensed under GPLv2.
 |
 |
- Download and enable this module.
- Create / Edit a view.
- In the 'Format' section, set the 'Format' as 'Simple Timeline'.
- Also in the 'Format' section, set the 'Show' as 'Simple Timeline Item'.
- Configure the fields that should be shown in the title and body.
- Configure any other parameters you may need and save the view.
- You can also use Node-view or the Panel-fields as row plugins with the simple timeline Plugin.
More details are available at A Simple Timeline | Drupal.org.
If users of Phimp.me Android app turn on the geographic location when uploading images, the GPS data (latitude and longitude) will be included in the EXIF data of images.
You can find a plugin which displays a map with that information automatically.
One choice is to use the plugins called GMap, Views and Location. You can see detailed information in How to Display Maps using GMap, Views and Location in Drupal 7
In this tutorial, we'll use two modules to create our map: Views to build a block and GMap for the actual map.
The map that we'll create will be fairly basic. The block will only be visible on the article page if an address is entered in.
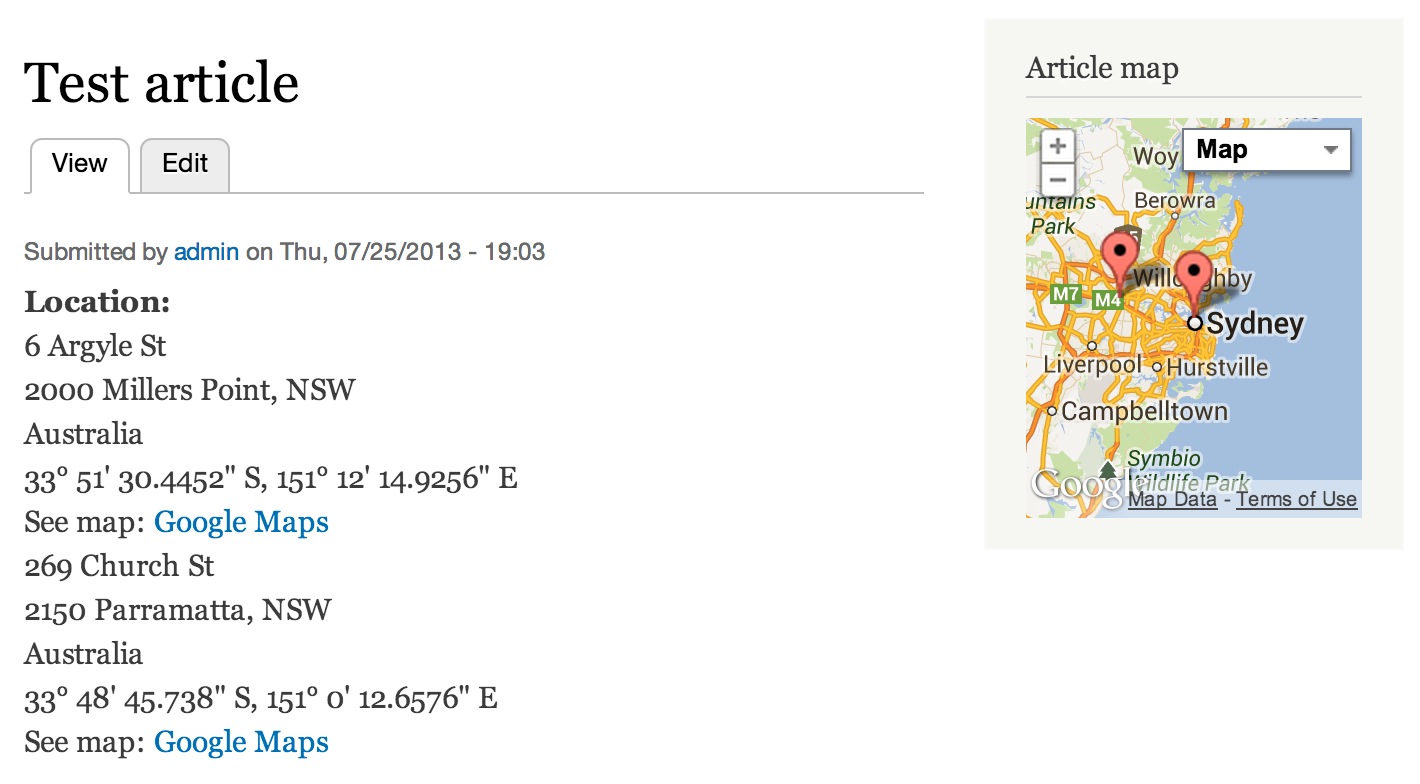
Below is an image of the finished product:
If you're looking for other mapping modules, then check out IP Geolocation Views & Maps. If you know of any other modules that integrate well with Location, leave a comment below.
I'll assume that you have read part one, and most importantly you downloaded and installed all required modules.
Let's jump right in and create a block view for our map.
Go to Structure, Views and click on "Add new view".
Fill in the "Add new view" form with the values defined in Table 1.0.
Table 1-0. Create a new view
Option Value View name Article map Machine name article_map Show Content (default) Of Type All (default) Create a page Unchecked Create a block Checked Display format GMap
- Click on Settings next to GMap in the Format area to configure the map.
- Make sure that the "Data Source" is set to "Location.module". Also, you can change what the marker looks like by selecting a different one from the "Marker / fallback marker to use" drop-down list.
Once everything has been configured click on Apply.
The next important piece to the puzzle is a contextual filter. We'll add a filter so that the view only displays the address of the article that is being viewed.
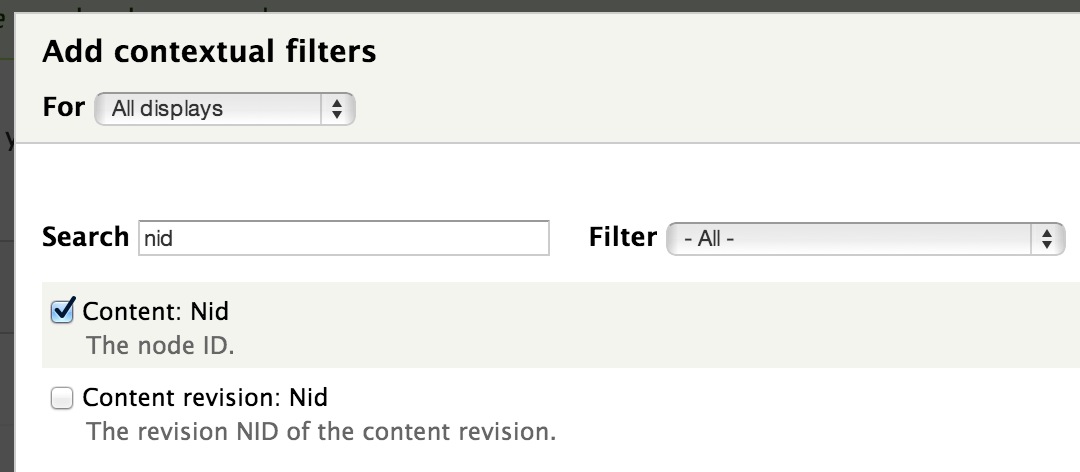
- Click on the Advanced link on the right, and then click on the Add button next to "Contextual filters".
- Search for "nid", select "Content: Nid" and click on Apply.
- We need to configure the contextual filter to use the content ID in the url.
This can easily be achieved by choosing the "Provide default value" radio button and then select "Content ID from URL" from the Type drop-down list.
At this point, we have a working view. Now all we need to do is add the view to a region and test it to make sure it works.
Save the view and then go to Structure, Blocks and assign the "View: Article map" block to a region.
Now head over to an article that has an address. You should see a map in the specified region.
As you can see, the map works, but I had to zoom all the way out to see the marker. Let's now configure the map so that it centers on the marker and sets an appropriate zoom level.
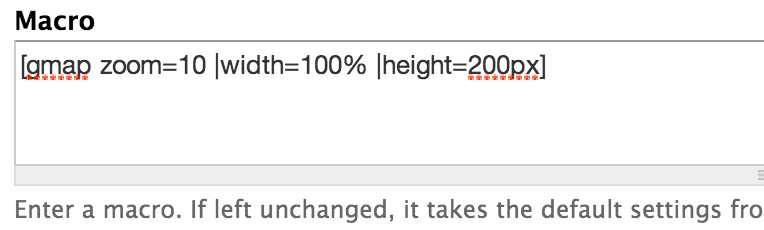
Go back to the edit page for the view and click on Settings next to GMap.
You can configure the map's width, height and zoom-level by defining a macro.
For this tutorial, copy and paste the macro below into the macro text-area.
[gmap zoom=10 |width=100% |height=200px]
If you need help with defining macros then look at the "GMap Macro Builder" sub-module.
- Scroll further down on the settings page and check the "Center on node argument" checkbox. This will make sure that the map centers on the marker.
Save the settings options and the view. Now if you go back to the article page you should see a more usable map, centered and zoomed in at the right level.
Adding multiple Markers to a map is pretty easy. Just configure Location to allow you to store more than one address.
In part one, we used the "Location CCK" module, so all you have to do is change the field's "Number of values" to unlimited.
This will then allow you to add multiple addresses.
I also recommend that you change the zoom value in the macro so you can see both markers.
Here is the updated macro code:
[gmap zoom=8 |width=100% |height=200px]Here's what the map looks like with multiple markers:
That's it for our two part series on Location and GMap. As you have seen, both modules work brilliantly together. With relatively little work: you can store addresses and create pretty decent maps in fairly little time.