Label and track C. elegans neurons.
IMPORTANT NOTICE: This repository is now stale. An up-to-date version is included in ZephIR repository. Install ZephIR and annotator will be installed as well.
- Clone git repository:
git clone https://github.com/venkatachalamlab/annotator.git- Checkout the current version:
git checkout v2.1.0Use the following command to see what's new in the most recent tagged version:
git show v2.1.0-
Make sure that following Python libraries are installed (prefer conda over pip):
- docopt
- flask
- gevent
- numpy
- scikit-image
- opencv
- h5py
- pandas
- dataclasses
- av
- Ipython
-
Open a command line interface and nagivate to the annotator repository. Install (development mode):
(base) annotator> python setup.py develop-
Open a command-line interface as administrator (command prompt, anaconda prompt, terminal, etc.) and navigate to dataset folder.
-
Enter the following command:
annotator --dataset=."
- Note: If installation is complete, you should get this message:
Starting a server on port 5000
- Open a web browser and try this:
http://localhost:5000/.

Before annotating your dataset it's always good to do a hard reload, to do so open your browser's console, in Chrome the keyboard shortcut is ctrl+shift+J. Right click on the reload button and select Empty Cache and Hard Reload. You can close the console now.
- You can use the following hotkeys if you are focused on the image ( by clicking on it):
f:           forward in time by 1 frmae
shift + f:   forward in time by 10 frames
d:           backwards in time by 1 frmae
shift + d:   backwards in time by 10 frames
v:           increase z by 0.05
shift + v    increase z by 0.20
ctrl + v     increase z by 0.01
c:           decrease z by 0.05
shift + c:   decrease z by 0.20
ctrl + c:    decrease z by 0.01
r:           next view (currently "slice", "mip", or "volume")
e:           previous view
o:           toggle fill circles
a:           toggle all / nearby annotations
0-9:         run selected macro
- Use light blue scrollbars or your mouse to locate neurons. "slice" view is ideal for this purpose.

- If neurons are not bright enough, use colored scrollbars to adjust lookup table.

- Use pink scrollbar or
f-dhotkeys orjump_to_framemacro (explained later) to explore different time points.
-
You can annotate a neuron by double clicking on its location or by using a macro (explained later).
-
When an annotation is selected, its information are shown in window "Annotation".
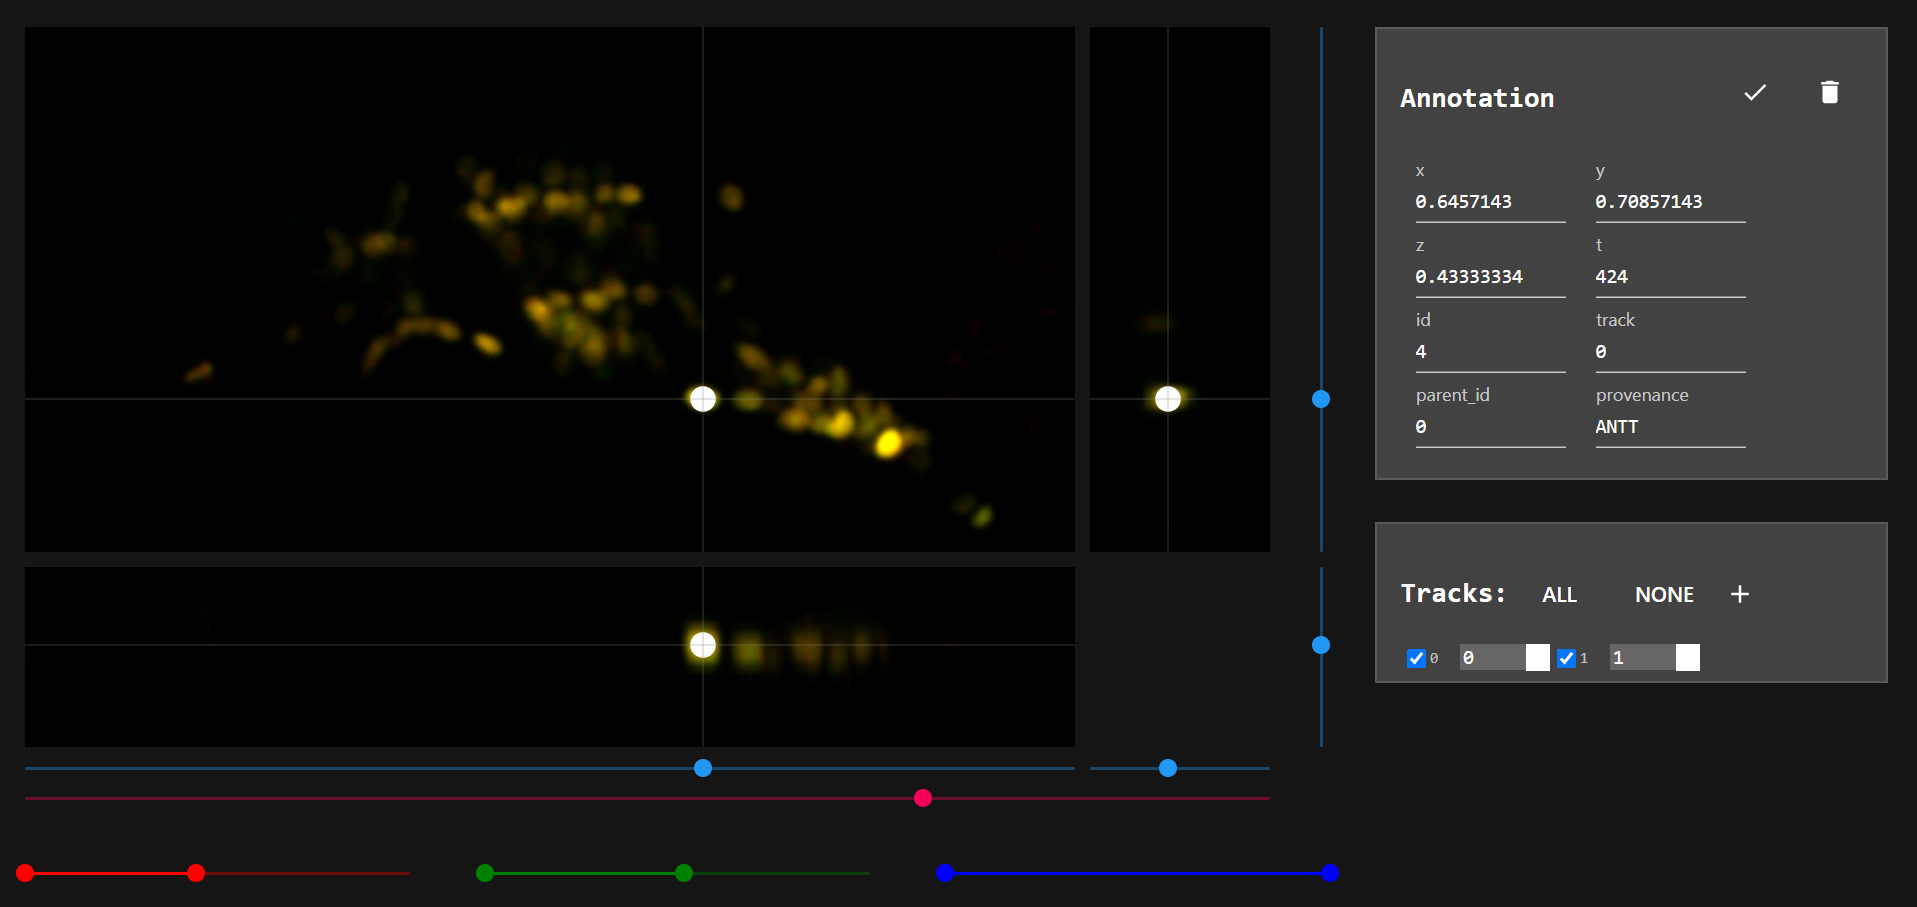
- Each neuron should have a unique track number through out the entire dataset. If you want to annotate another neuron, create a new track by clicking on
+in "Tracks" window.
- Note: New track is not automatically selected when created. To select a track uncheck-check it in "Tracks" window.
Annotating a neuron at different time points, Creating and selecting a new track, Finding the best point to represent a neuron is easier if they are done by hotkeys. In "Annotation window" you can choose different macros and assign them to number keys.

insert_local_max: Finds the closest maximum to the current location and labels it with the current track number. Its arguments specify the search area. You can have different keys for this macro with different arguments to use them for neurons of different size.
- Note: When you click on different parts of the image, you can see their coordinates in "Annotation window". Choose a averag sized neuron and take advantage of this feature to get an idea about the dimentions of a neuron. Use this information to set parameters for this macro.
-
jump_to_frame: Jumps to the specified time point. When annotating multiple time points, it is useful to have a key for each time point. -
create_track: Creates a new track and selects it.
Example:
In the above picture, the current track is 1. If I click on any part of the image and then press key '2', it jumps to t=12. I then click on the center of a neuron (roughly), by pressing "1", it automatically finds the brighest point close to wheren I clicked and labels it. Now I use key "3" to jump to t=185. Since the track number is not changed, if I find the same neuron and press "1", it labels it. Now pressing key "4" creates a new track and selects it so I can jump back to t=12 by pessing key '2' and find a new neuron to label.
You can find and install NeuronIR software here: https://github.com/venkatachalamlab/NeuronIR
change_provenance( *, _now, NEIR, ANTT ): Updates all neurons in the active frame with provenance "NEIR" to "ANTT." This effectively promotes the current frame with NeuronIR results to a full verified annotation.update_neir( _now, True, False ): Given some partial annotations in the current frame, runs NeuronIR on the neurons connected to those annotated ones via intra-neuron regularization springs ONLY. This is a fast, efficient way to see how a set of partial annotation can affect the results.overwrite_neir_checkpoint( kn_max, 10 ): Updates a given keyword argument for NeuronIR ("kn_max") with the given value ("10") in the checkpoint.pt file. Any updates to arguments for model building/compiling will trigger a recompile and may take longer to complete. Use this to update NeuronIR parameters when using update_neir.
On the top right on "Annotation window" there are two buttons to save annotations and load them. Annotation are save in the dataset directory.
This was created using the following tools:
- React JavaScript Framework (create-react-app)
- Typescript
- Redux (state management)
- Redux-saga (async stuff)