- 사용하는 그래픽카드의 그래픽드라이버 최신 버전으로 업데이트
- https://en.wikipedia.org/wiki/CUDA 참조하여 GPU의 Compute Capability에 따라 권장되는 Version의 Cuda 설치
- Cuda 설치 주소 : https://developer.nvidia.com/cuda-downloads
-
Git
- 우분투의 경우 아래 명령어를 통해 Yolov5 다운로드
$ git clone https://github.com/ultralytics/yolov5
- Yolov5 구동을 위한 필요 라이브러리를 아래의 명령어를 통해 설치 (Git을 통해 다운받은 Yolov5 폴더 내에 requirements.txt 존재)
$ pip install –r requirements.txt
-
Docker
- 우분투의 경우 링크(https://docs.docker.com/engine/install/ubuntu/)를 참고하여 도커 설치
- GPU 사용을 위하여 링크(https://docs.nvidia.com/datacenter/cloud-native/container-toolkit/install-guide.html#docker)를 참고하여 Nvidia-Docker 설치
- 도커 허브로부터 아래의 명령어를 통해 이미지 다운로드
$ sudo docker pull zlstl1/yolov5_custom:1.0
- 만일 도커 이미지 파일(tar)을 로드 할 경우 아래 명령어 사용
$ sudo docker load -i yolov5_custom_docker_image.tar
- 도커 이미지 실행 (호스트 PC에 데이터셋을 저장하고 도커 컨테이너 볼륨 연동)
$ sudo docker run --ipc=host --gpus all -it --name yolov5 -v “{데이터셋 경로}”:/usr/src/yolov5_data/ zlstl1/yolov5_custom:1.0
- 다운 받은 Yolov5 폴더 내에 dataset.yaml 파일의 내용을 준비된 데이터셋 파일 위치로 작성
- 학습용 데이터의 이미지가 위치한 폴더들(Train, Validation, Test set)의 경로를 입력하고, 총 클래스의 수와 클래스명 리스트 작성
train: ../yolov5_data/images/train/
val: ../yolov5_data/images/val/
test: ../yolov5_data/images/test/

nc: 83

names: ["flatness_A", "flatness_B", "flatness_C", "flatness_D", "flatness_E", "walkway_paved", "walkway_block", "paved_state_broken", "paved_state_normal",
"block_state_broken", "block_state_normal", "block_kind_bad", "block_kind_good", "outcurb_rectangle", "outcurb_slide", "outcurb_rectangle_broken", "restspace", "sidegap_in",
"sidegap_out", "sewer_cross", "sewer_line", "brailleblock_dot", "brailleblock_line", "brailleblock_dot_broken", "brailleblock_line_broken", "continuity_tree",
"continuity_manhole", "ramp_yes", "ramp_no", "bicycleroad_broken", "bicycleroad_normal", "planecrosswalk_broken", "planecrosswalk_normal", "steepramp", "bump_slow", "weed",
"floor_normal", "flowerbed", "parkspace", "tierbump", "stone", "enterrail", "stair_normal", "stair_broken", "wall", "window_sliding", "window_casement", "pillar", "lift",
"door_normal", "lift_door", "resting_place_roof", "reception_desk", "protect_wall_protective", "protect_wall_guardrail", "protect_wall_kickplate", "handle_vertical",
"handle_lever", "handle_circular", "lift_button_normal", "lift_button_openarea", "lift_button_layer", "lift_button_emergency", "direction_sign_left", "direction_sign_right",
"direction_sign_straight", "direction_sign_exit", "sign_disabled_toilet", "sign_disabled_parking", "sign_disabled_elevator", "sign_disabled_callbell", "sign_disabled_icon",
"braille_sign", "chair_multi", "chair_one", "chair_circular", "chair_back", "chair_handle", "number_ticker_machine", "beverage_vending_machine", "beverage_desk", "trash_can",
"mailbox"]
- 이 때, 이미지 폴더의 경로만 입력하며 라벨링 폴더는 지정한 이미지 폴더와 같은 수준에서 labels 폴더를 자동탐색하며 Label 데이터는 Yolov5에 적용하기 위해 전처리 과정을 거쳐야 함
- Json 라벨링 파일을 Yolov5 포맷의 txt 파일로 전처리하는 코드는 preprocessing_data 폴더에 존재
- 폴더 구성 예시
yolov5_data(d) ┌ images(d) ┌ test(d) │ ├ train(d) │ └ val(d) └ labels(d) ┌ test.py(d) ├ pretrain_weights.pt(d) └ dataset.yaml(d) - Yolov5 폴더에 Pretrain된 모델 Weight 파일 준비 (https://drive.google.com/file/d/1x9GY9VzzxrQQz_t1nu-YWjJGcfJrHxAO/view?usp=sharing)
- 하이퍼파라미터 설정
- Yolov5에서 제공하는 hyp.scratch.yaml을 사용해도 되며, 아래 테스트에 사용된 하이퍼파라미터를 사용할 수 있음
- 아래 하이퍼파라미터는 Yolov5에서 제공하는 evolve 기능을 활용하여 300회 테스트를 거쳐 작성된 하이퍼파라미터임
lr0: 0.009934738973528694
lrf: 0.21644279974757322
momentum: 0.9046840664373422
weight_decay: 0.0005
warmup_epochs: 2.8106678828929703
warmup_momentum: 0.8083371255070754
warmup_bias_lr: 0.09964175754168185
box: 0.05197184912237901
cls: 0.4713686246148482
cls_pw: 0.9996313350307685
obj: 1.0356181747417663
obj_pw: 1.0442242765666825
iou_t: 0.2
anchor_t: 3.6934069617987126
fl_gamma: 0.0
hsv_h: 0.015
hsv_s: 0.7340341395870112
hsv_v: 0.3501362351182459
degrees: 0.0
translate: 0.10443998162459062
scale: 0.4855717407337331
shear: 0.0
perspective: 0.0
flipud: 0.0
fliplr: 0.5113753013965541
mosaic: 1.0
mixup: 0.0
- 최종 폴더체계 – 중요 파일 위치 (d:디렉토리 f:파일)
Yolov5(d) ┌ train.py(f)
          ├ test.py(f)
          ├ pretrain_weights.pt(f)
          ├ dataset.yaml(f)
          └ data(d) - hyp_evolved.yaml(f)
- 테스트 코드 예시 (dataset.yaml 및 pretrain_weights.pt는 4번 항목에서 준비된 데이터셋 설정 파일과 weight 파일명에 따라 다름)
$ python3 test.py --data dataset.yaml --weights pretrain_weights.pt --task test- 학습 코드 예시
$ python3 train.py --data dataset.yaml --weights pretrain_weights.pt --hyp hyp_evolved.yaml --epochs 300 --batch 32- Labelme 프로그램을 본사업에 사용하기 위하여 커스터마이징 함
- Labelme_customizing 실행파일 다운로드
- Labelme_customizing 소스코드 다운로드
- 위 링크를 통해 labelme_customizing_v3.3.zip 파일을 다운받고 압축을 해제한 뒤, main.exe 파일 실행시 라벨링 툴 작동

This repository represents Ultralytics open-source research into future object detection methods, and incorporates our lessons learned and best practices evolved over training thousands of models on custom client datasets with our previous YOLO repository https://github.com/ultralytics/yolov3. All code and models are under active development, and are subject to modification or deletion without notice. Use at your own risk.
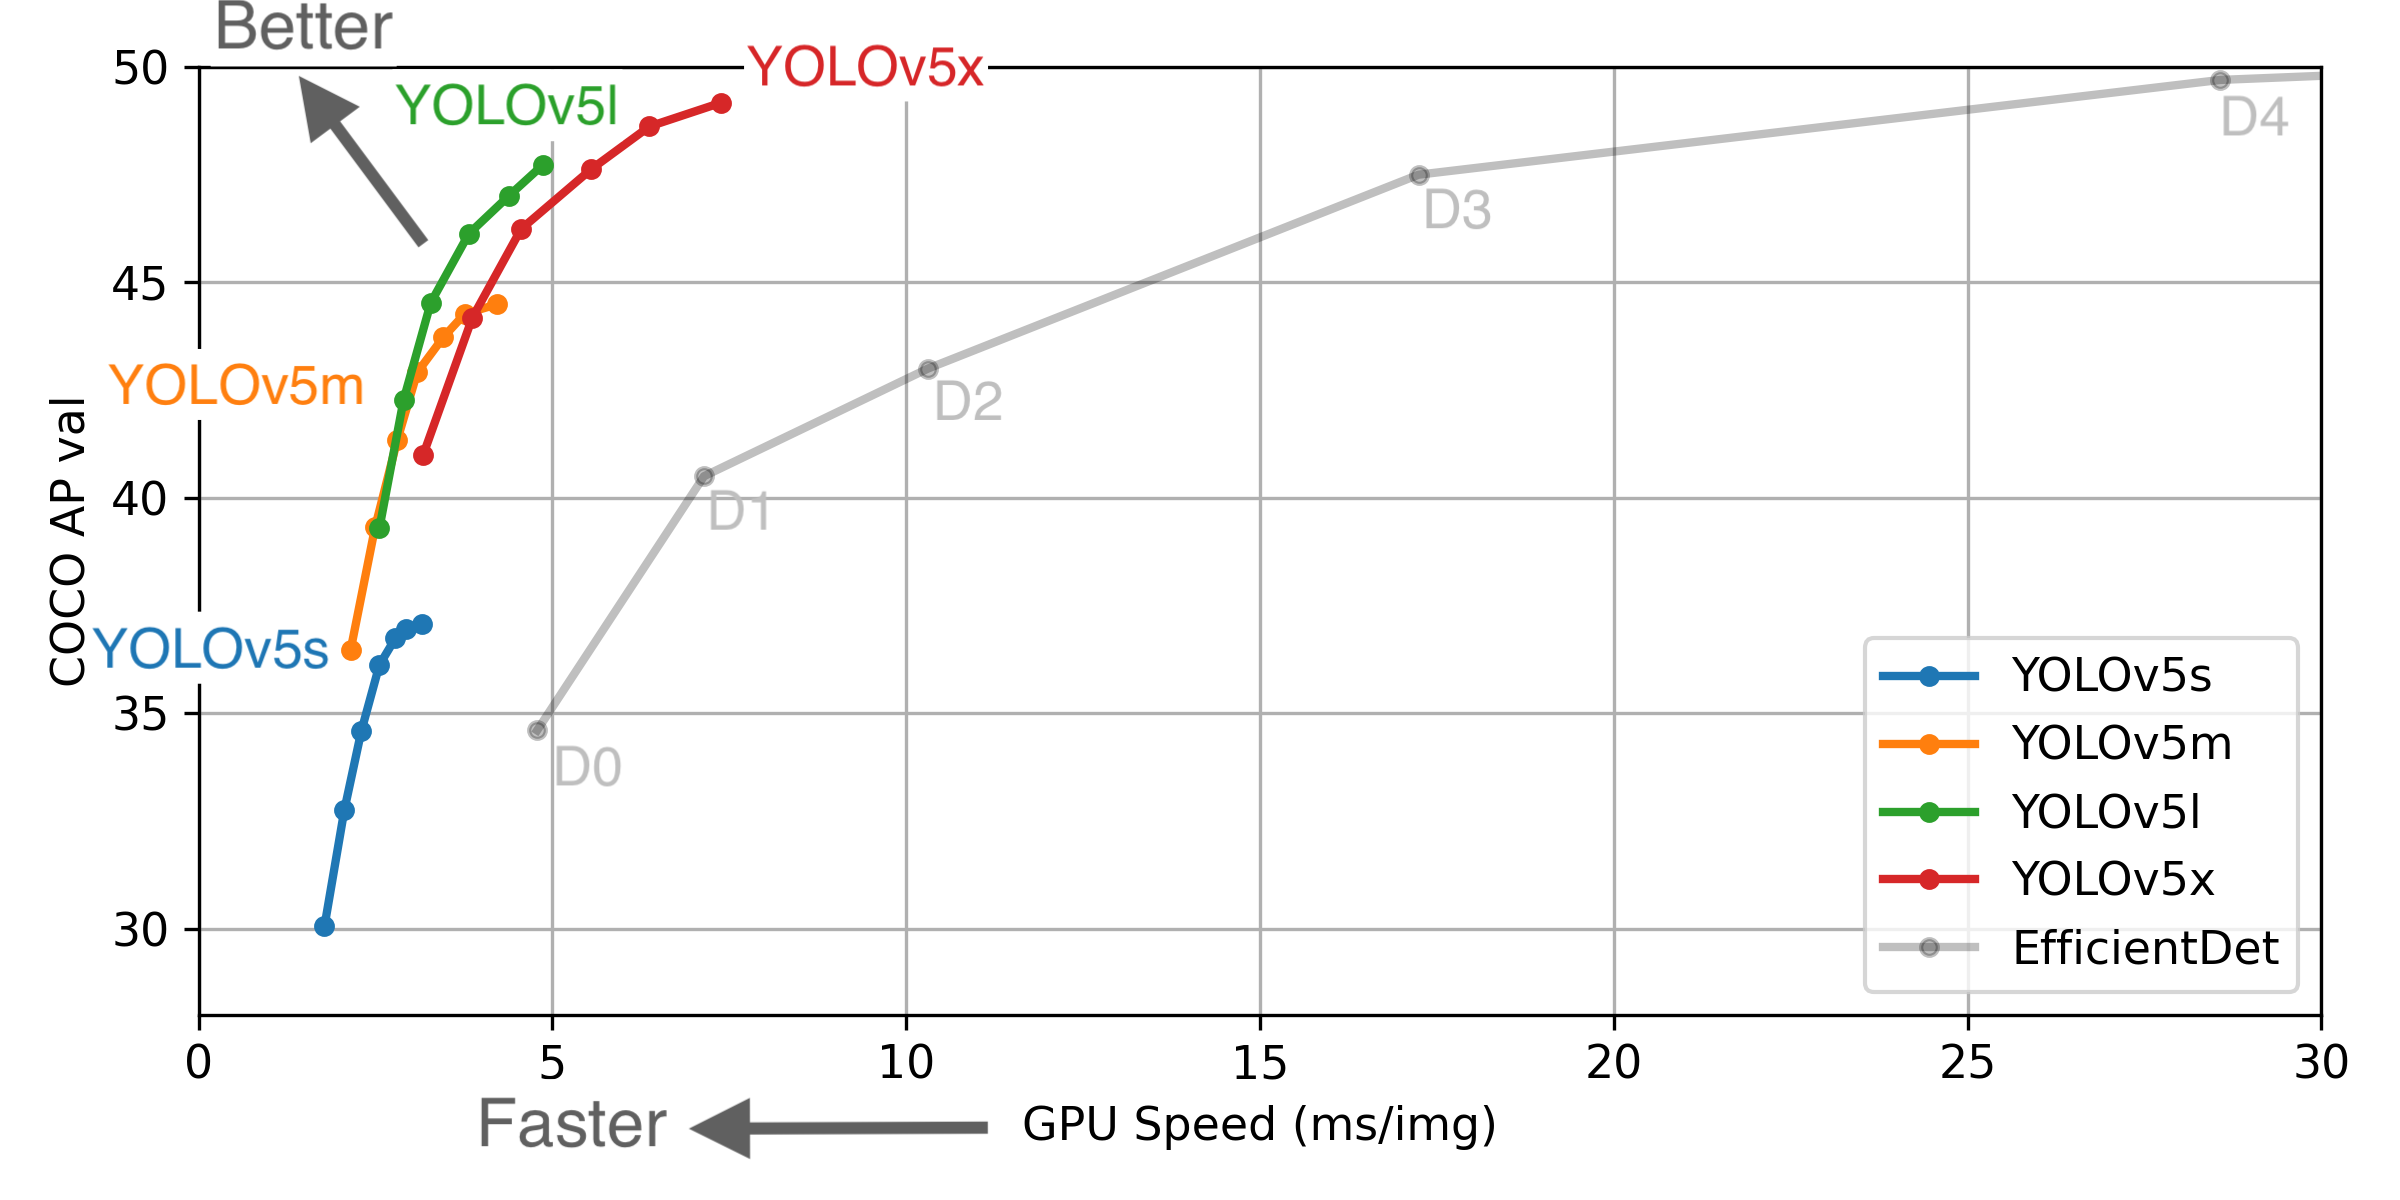
 ** GPU Speed measures end-to-end time per image averaged over 5000 COCO val2017 images using a V100 GPU with batch size 32, and includes image preprocessing, PyTorch FP16 inference, postprocessing and NMS. EfficientDet data from google/automl at batch size 8.
- August 13, 2020: v3.0 release: nn.Hardswish() activations, data autodownload, native AMP.
- July 23, 2020: v2.0 release: improved model definition, training and mAP.
- June 22, 2020: PANet updates: new heads, reduced parameters, improved speed and mAP 364fcfd.
- June 19, 2020: FP16 as new default for smaller checkpoints and faster inference d4c6674.
- June 9, 2020: CSP updates: improved speed, size, and accuracy (credit to @WongKinYiu for CSP).
- May 27, 2020: Public release. YOLOv5 models are SOTA among all known YOLO implementations.
| Model | APval | APtest | AP50 | SpeedGPU | FPSGPU | params | FLOPS | |
|---|---|---|---|---|---|---|---|---|
| YOLOv5s | 37.0 | 37.0 | 56.2 | 2.4ms | 416 | 7.5M | 13.2B | |
| YOLOv5m | 44.3 | 44.3 | 63.2 | 3.4ms | 294 | 21.8M | 39.4B | |
| YOLOv5l | 47.7 | 47.7 | 66.5 | 4.4ms | 227 | 47.8M | 88.1B | |
| YOLOv5x | 49.2 | 49.2 | 67.7 | 6.9ms | 145 | 89.0M | 166.4B | |
| YOLOv5x + TTA | 50.8 | 50.8 | 68.9 | 25.5ms | 39 | 89.0M | 354.3B | |
| YOLOv3-SPP | 45.6 | 45.5 | 65.2 | 4.5ms | 222 | 63.0M | 118.0B |
** APtest denotes COCO test-dev2017 server results, all other AP results denote val2017 accuracy.
** All AP numbers are for single-model single-scale without ensemble or TTA. Reproduce mAP by python test.py --data coco.yaml --img 640 --conf 0.001 --iou 0.65
** SpeedGPU averaged over 5000 COCO val2017 images using a GCP n1-standard-16 V100 instance, and includes image preprocessing, FP16 inference, postprocessing and NMS. NMS is 1-2ms/img. Reproduce speed by python test.py --data coco.yaml --img 640 --conf 0.25 --iou 0.45
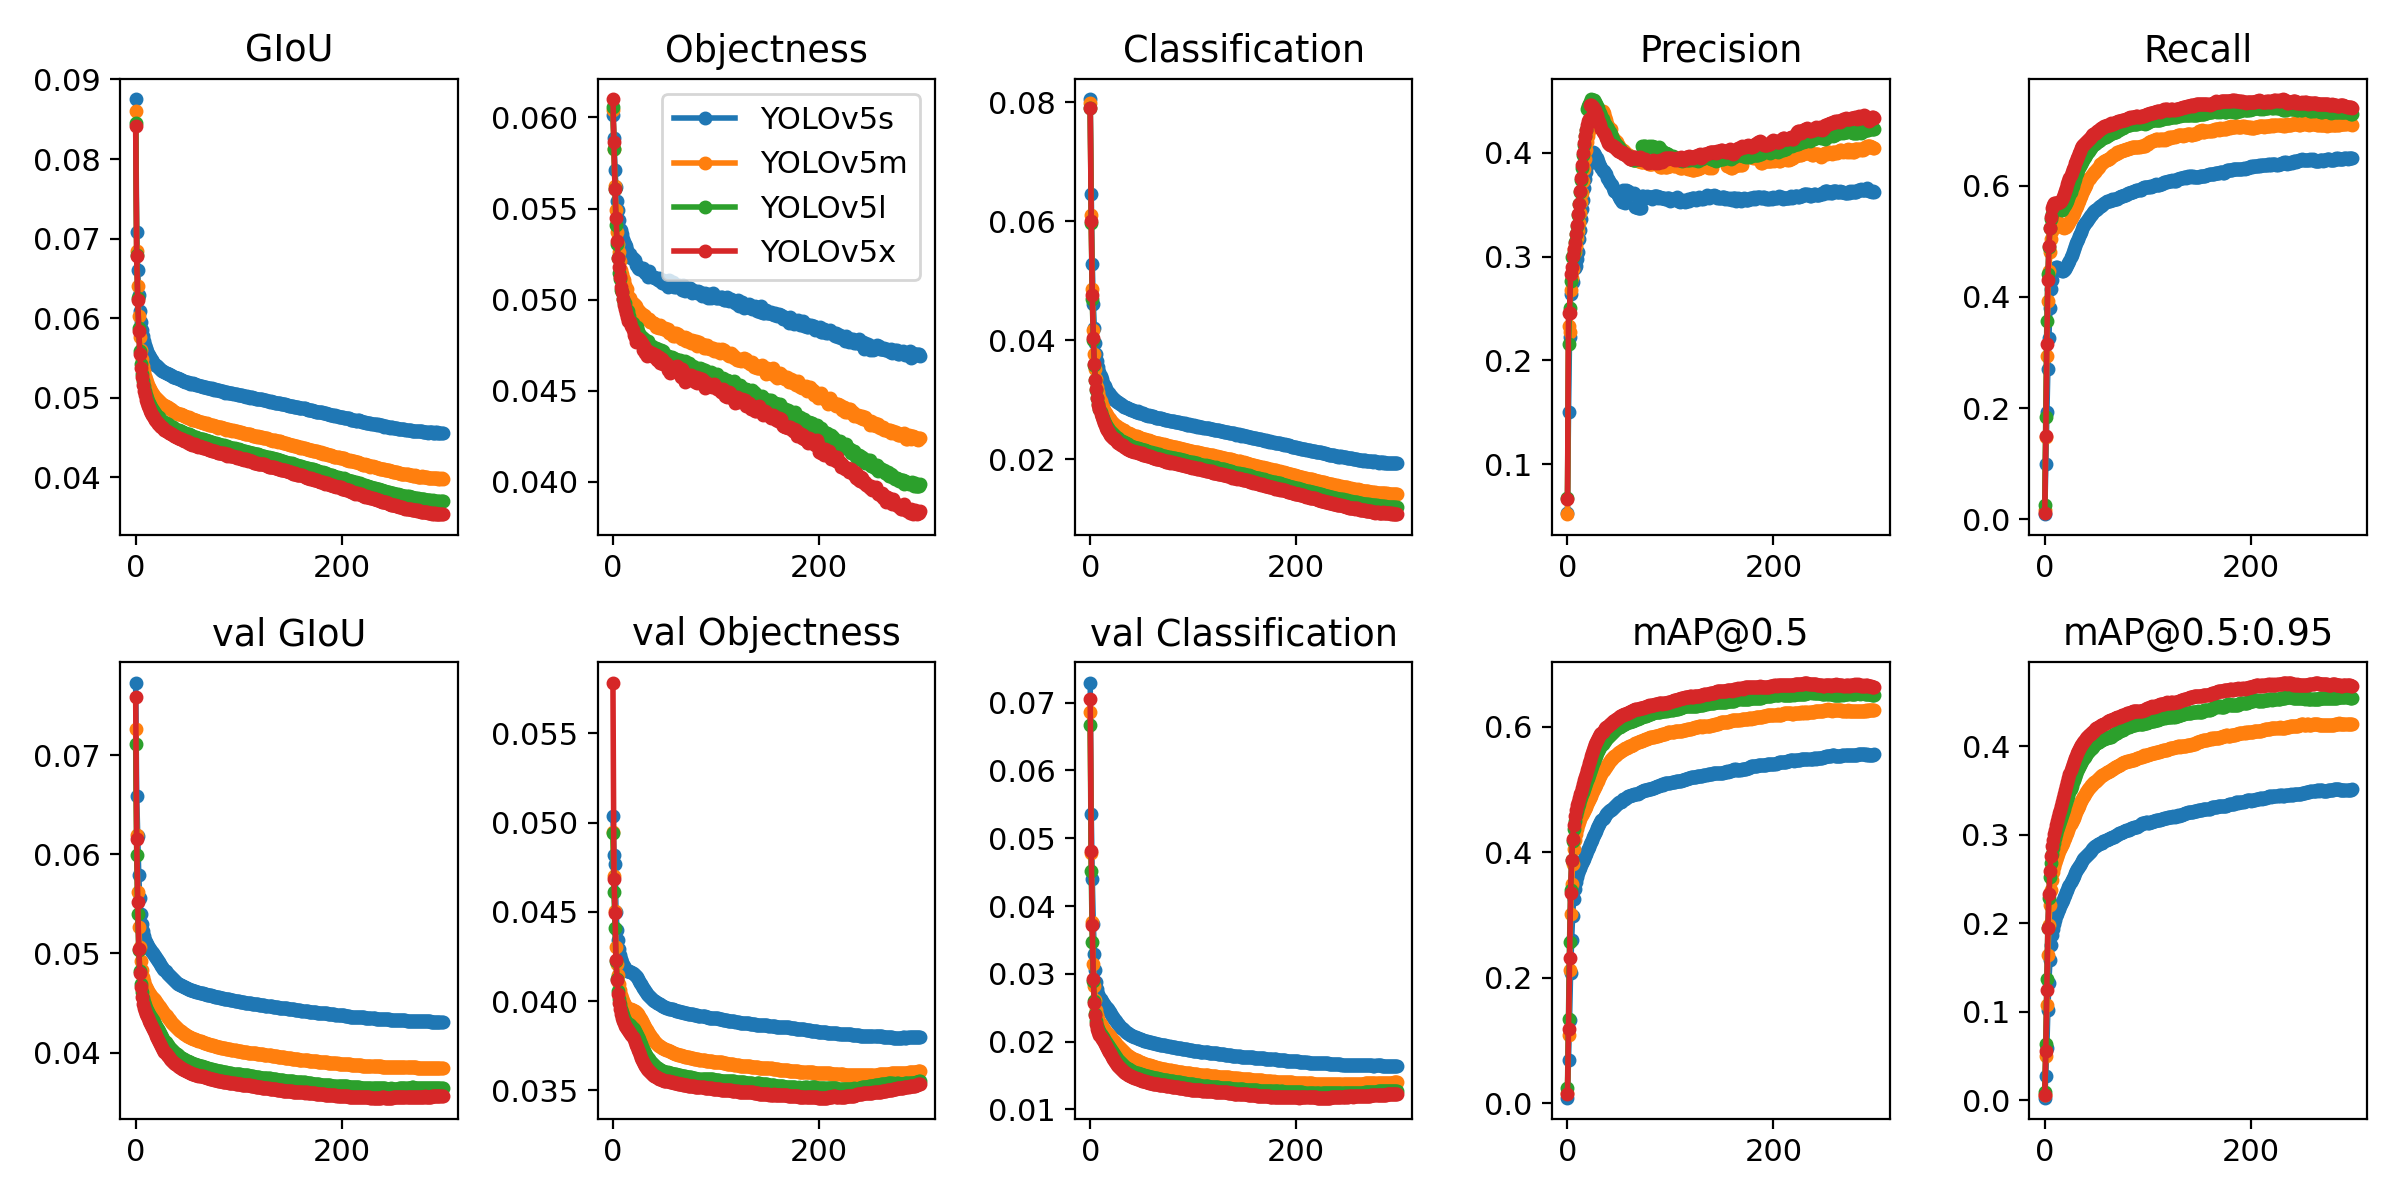
** All checkpoints are trained to 300 epochs with default settings and hyperparameters (no autoaugmentation).
** Test Time Augmentation (TTA) runs at 3 image sizes. Reproduce TTA by python test.py --data coco.yaml --img 832 --iou 0.65 --augment
Python 3.8 or later with all requirements.txt dependencies installed, including torch>=1.7. To install run:
$ pip install -r requirements.txt- Train Custom Data 🚀 RECOMMENDED
- Weights & Biases Logging 🌟 NEW
- Multi-GPU Training
- PyTorch Hub ⭐ NEW
- ONNX and TorchScript Export
- Test-Time Augmentation (TTA)
- Model Ensembling
- Model Pruning/Sparsity
- Hyperparameter Evolution
- Transfer Learning with Frozen Layers ⭐ NEW
- TensorRT Deployment
YOLOv5 may be run in any of the following up-to-date verified environments (with all dependencies including CUDA/CUDNN, Python and PyTorch preinstalled):
- Google Colab Notebook with free GPU:
- Kaggle Notebook with free GPU: https://www.kaggle.com/ultralytics/yolov5
- Google Cloud Deep Learning VM. See GCP Quickstart Guide
- Docker Image https://hub.docker.com/r/ultralytics/yolov5. See Docker Quickstart Guide
detect.py runs inference on a variety of sources, downloading models automatically from the latest YOLOv5 release and saving results to runs/detect.
$ python detect.py --source 0  # webcam
                            file.jpg  # image
                            file.mp4  # video
                            path/  # directory
                            path/*.jpg  # glob
                            rtsp://170.93.143.139/rtplive/470011e600ef003a004ee33696235daa  # rtsp stream
                            rtmp://192.168.1.105/live/test  # rtmp stream
                            http://112.50.243.8/PLTV/88888888/224/3221225900/1.m3u8  # http stream
To run inference on example images in data/images:
$ python detect.py --source data/images --weights yolov5s.pt --conf 0.25

Namespace(agnostic_nms=False, augment=False, classes=None, conf_thres=0.25, device='', img_size=640, iou_thres=0.45, save_conf=False, save_dir='runs/detect', save_txt=False, source='data/images/', update=False, view_img=False, weights=['yolov5s.pt'])
Using torch 1.7.0+cu101 CUDA:0 (Tesla V100-SXM2-16GB, 16130MB)

Downloading https://github.com/ultralytics/yolov5/releases/download/v3.1/yolov5s.pt to yolov5s.pt... 100%|██████████████| 14.5M/14.5M [00:00<00:00, 21.3MB/s]

Fusing layers...
Model Summary: 232 layers, 7459581 parameters, 0 gradients
image 1/2 data/images/bus.jpg: 640x480 4 persons, 1 buss, 1 skateboards, Done. (0.012s)
image 2/2 data/images/zidane.jpg: 384x640 2 persons, 2 ties, Done. (0.012s)
Results saved to runs/detect/exp
Done. (0.113s)To run batched inference with YOLOv5 and PyTorch Hub:
import torch
from PIL import Image

# Model
model = torch.hub.load('ultralytics/yolov5', 'yolov5s', pretrained=True).autoshape()  # for PIL/cv2/np inputs and NMS

# Images
img1 = Image.open('zidane.jpg')
img2 = Image.open('bus.jpg')
imgs = [img1, img2]  # batched list of images

# Inference
prediction = model(imgs, size=640) # includes NMSDownload COCO and run command below. Training times for YOLOv5s/m/l/x are 2/4/6/8 days on a single V100 (multi-GPU times faster). Use the largest --batch-size your GPU allows (batch sizes shown for 16 GB devices).
$ python train.py --data coco.yaml --cfg yolov5s.yaml --weights '' --batch-size 64
                                         yolov5m                                40
                                         yolov5l                                24
yolov5x 16Ultralytics is a U.S.-based particle physics and AI startup with over 6 years of expertise supporting government, academic and business clients. We offer a wide range of vision AI services, spanning from simple expert advice up to delivery of fully customized, end-to-end production solutions, including:
- Cloud-based AI systems operating on hundreds of HD video streams in realtime.
- Edge AI integrated into custom iOS and Android apps for realtime 30 FPS video inference.
- Custom data training, hyperparameter evolution, and model exportation to any destination.
For business inquiries and professional support requests please visit us at https://www.ultralytics.com.
Issues should be raised directly in the repository. For business inquiries or professional support requests please visit https://www.ultralytics.com or email Glenn Jocher at [email protected].


